
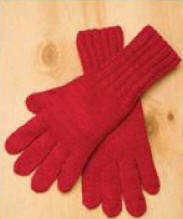
Basic Gloves
Tricot / Knitting
Like socks, gloves can be a bit daunting before you make your first pair. They look difficult, with all the small finger sections worked on double pointed needles. But, like socks, once you make a pair of gloves, you see how little there is to it, just the cuff, the hand and all the finger sections.
The fingers are actually so small and are basically the same process over and over again, that once you know gloves, they aren’t so complex after all.
One thing nice about gloves is that each glove takes less time to make than the arm of a sleeve on a sweater, and once you get used to them, they are wonderful items to showcase your knitting skills or try out new stitches and patterns while making a useful and special gift.
This pattern is for gloves using worsted or sock weight yarn to fit an average sized hand.
Basic Worsted
Notes:
To increase for gusset, knit into the back of the strand between the stitches.
To add 1 stitch between fingers, knit into the front and the back of the last stitch before joining the palm side to the back side at the base of the finger.
To add 2 stitches between fingers, knit into the front, the back, and the front of the last stitch before joining the palm side to the back side at the base of the finger.
Finished Size
To fit medium women’s hand 4" across palm
Materials
Two 1.75 oz. skein worsted sock weight yarn

One set Size 4 (size 3) 6” dpn
Tapestry needle
Embroidery thread
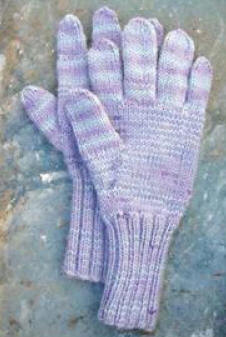
Sock weight Gloves: Koigu KPM (100% merino wool, 1.75 oz., 175 yd.), 2 skeins
in #2097.
Worsted weight Gloves: The Purled Llama Yarn Co.’s Carino (50% superfine
alpaca/50% wool, 4 oz., 500 yd.) in color Wisdom.

Gauge
Gauge in stockinette stitch using the smaller needles and yarn 28 sts and 36 rows = 4"
Yarn used for samples shown
Sock weight gloves: Koigu KPM (100% merino wool, 1.75 oz., 175 yd), 2 skeins in #2097.
Worsted weight gloves: The Purled Llama Yarn Co.'s Carino (50% superfine alpaca/50% wool, 4 oz., 500 yd) in color Wisdom.
Left Glove Cuff and Body
CO 44 (48) sts, join into a circle, placing marker at the beg of the round.
Work 2k, p2 rib for 4".
Cont knitting in the round in St st for 6 rounds.
On the next round, inc 1 st on both sides of the first st in the round.
K 2 rounds even in St st.
On the next round, inc 1 st at the beg of the round, k3, inc 1, knit around. K 2 rounds even in St st.
On the next round, inc 1 st at the beg of the round, k5, inc 1, knit around.
Rep the 3 round patt 2 more times, knitting 7, then 9 sts between increases at the beg of the inc rounds - 54 (58) sts.
Use provisional cast on to CO 8 sts at beg of round, move 11 thumb sts to scrap of yarn, knit around - 51 (55) sts on needles.
K 3 sts, k2tog, continue in St st around - 50 (54) sts. Work around in St st.
K3 sts, k2tog, continue in St st around - 49 (53) sts. Work around in St st.
K3, k2tog, continue in St st around - 48 (52) sts. Work even in St st for 8 (10) more rounds, ending the last round 1 st before the stitch marker, remove the stitch marker.
Pointer finger
Continuing with the yarn from the Cuff and Body, pick up the next 13 sts over 3 needles, casting on 2 more sts by knitting into the front, the back and the front of the 13th st.
Move the remaining stitches to a scrap of yarn - 16 sts for pointer finger.
Work even in the round until the pointer finger is 21.4" long, or 1.4" from the top of the finger.
Fold the knitting so it lays fl at between the palm and the back and mark the sides.
On the next round make a centered double decrease at each side - 12 sts. Work the next round even.
On the next round make a centered double decrease at each side again - 8 sts. Cut the yarn to 8" and pass through all the remaining sts.
Weave in end.
Thumb
Pick up the 11 sts from the thumb gusset, 1 (2) sts on ea side, and 8 sts from the CO section of the thumb hole - 21 (23) sts. Rnd 1: Knit.
Rnd 2: Dec 1 st at the center of the 8 CO sts of the thumb hole - 20 (22) sts.
Rnd 3: Knit.
Rnd 4: Dec 1 st above the previous dec - 19 (21) sts.
Rnd 5–8: Rep rnd 3 and rnd 4 - 18 (20) then 17 (19) sts.
Work even until 1.4" from top of thumb.
Fold the thumb so it lays fl at as shown at right and mark the sides.
On the next round make a centered double decrease at each side of thumb - 13 (15) sts.
Work the next round even.
On the next round make a centered double decrease at each side again - 9 (11) sts. Cut the yarn to 8" and pass through all the remaining sts.
Weave in end.
Middle finger
Pick up 6 from the front, CO 2 sts between front and back, pick up 6 from the back, and pick up 2 more sts from the finished finger - 16 sts.
Work even until 21.2" long, or 1.4" from the top of the finger. Fold the finger so it lays fl at and mark the sides.
On the next round make a centered double decrease at each side - 12 sts.
Work the next round even.
On the next round make a centered double decrease at each side again - 8 sts. Cut the yarn to 8" and pass through all the remaining sts.
Weave in end.
Ring finger
Work the same as the Middle Finger.
Little finger
Pick up the remaining 11 (14) sts for the little finger, pick up 2 more stitch between fingers - 13 (16) sts. K 3 rounds.
On the next round, dec 1 st above the 2 sts between fingers - 12 (15) sts.
Work 3 rounds even, then dec 1 st in the same place as before - 11 (14) sts.
Work even until 13.4" long, or 1.4" from the top of the finger.
Fold the finger so it lays fl at and mark the sides.
On the next round make a centered double decrease at each side - 7 (10) sts.
Work the next round even.
On the next round make a centered double decrease at each side again - 3 (6) sts.
Cut the yarn to 8" and pass through all the remaining sts.
Weave in end.
Block gloves to size.
Making it your size
To adjust the pattern for larger or smaller sizes, measure snugly around the palm of the hand and multiply that number by the number of stitches per inch of your yarn.
This will be the number of stitches to cast on.
Follow the instructions for the Cuff and Body, trying on the knitting as you get to each section to make sure it will fi t. For the fingers, I like to thread the stitches onto small (about 6") lengths of yarn, one for each finger, then I tie each one into a circle and try the glove on to see if the fingers will be the right size.
This is a good method, when you are not sure how many stitches you will need for each finger, because you can try it several times until you get the correct grouping of stitches.
Once you have determined how many stitches you want in each finger, it’s a simple matter of knitting one finger at a time from each group, adding two stitches between fingers.

![]()