Intarsia Techniques (Color Pattern)
Tricot / Knitting
Following are some basic skills you’ll use when knitting intarsia, including how to change yarn colors in the middle of a row, how to easily manage all those pesky yarn tails, and how to use an embroidery technique called duplicate stitch to add tiny sections of color to a design. We’ll even explore some painless ways to work intarsia when knitting in the round.
Interlocking to Prevent Holes
To begin knitting with a new color yarn, we often just pick up the new yarn and begin! Not so with intarsia, which demands that we change yarns frequently within a pattern row.
When starting a new yarn and switching between yarns, use an interlocking maneuver—twisting the yarns together—to avoid creating unwanted holes in the fabric.
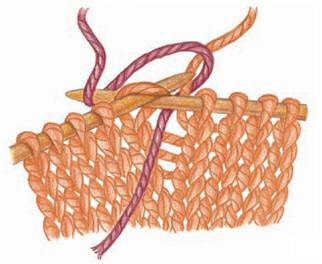
Starting a New Yarn Supply Mid-Row Here’s how to attach a new yarn supply in the middle of a row. It might seem counterintuitive to leave the yarn tail hanging on the right side of the fabric, but it interlocks the tail securely with the fabric.
Later you’ll pull the tail to the back and weave it in. On a right-side row: Place the new ball of yarn on the wrong side of the fabric, leaving a 6"/[15cm] tail dangling on the right side of the fabric. Lift the old yarn and bring it over and to the left of the new yarn (illustration). Grab the new yarn and simply begin knitting with it.
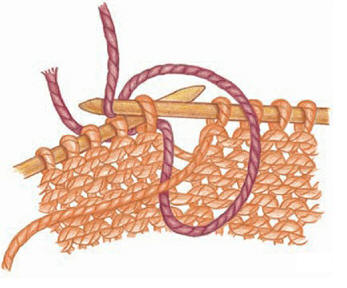
On a wrong-side row:
Place the new ball of yarn on the wrong side of the fabric, leaving a 6"/[15cm] tail hanging on the right side of the fabric. Lift the old yarn and bring it over and to the left of the new yarn (illustration). Grab the new yarn and start purling with it.
color PLAY
I use the yarn-tail-to-the-right-side-of-the-fabric technique every time I join a new supply of yarn in the middle of a row, not just for intarsia!
It interlocks the pesky tails within the knitted fabric and helps stabilize it, making finished measurements and gauge much more accurate.
Switching Between Yarns
The method for changing from one color to another color is surprisingly easy and is the same no matter which side of the fabric you’re on.
To pick up a yarn already in use:
Drop the old yarn to the left of the new one, then pick up the new one from underneath the old one, bring it over the new one, and begin knitting.

or purling, whichever is appropriate.
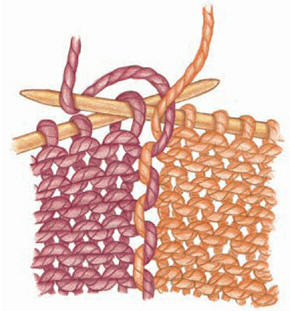
NOTE: Use the same method for switching between yarns whether the new stitches are directly above stitches previously knit in that color or placed diagonally.
Intarsia in the Round
In most cases, intarsia is knitted back and forth in rows. However, to make finishing quicker and easier, some knitters prefer to knit in the round. But working intarsia in the round leaves yarn supplies hanging on the left-hand side of each area of color, while the knitter needs them on the right side in order to knit.
For knitters devoted to circular knitting, I offer three work-arounds for this issue. Technically, these methods are knitted back and forth, even though circular or double-pointed knitting needles are used. Special tricks connect the beginnings and ends of the rounds-rows so they appear seamless.
color PLAY
When working in the round with double-pointed needles, try not to place the beginning of rounds at the intersection of two needles. Your fabric will be neater— and you’ll be a much happier knitter—if you’re not changing needles while dealing with the beginning- and end-of-round joins.
Connecting Ends of the Rounds Using Yarn Overs
The first method of working intarsia in the round uses yarn over stitches. A yarn over is added at the beginning of every round. This extra stitch is decreased away at the end of the round to maintain the stitch count. To begin, place a marker on the first and last stitches of the round.
With the right side of the fabric facing you, starting at the beginning-of-round marker, yarn over, then knit in your pattern across the entire first round, ending just before the marked last stitch of the round (just one stitch before the yarn over).
Join this next stitch and the yarn over together by making an ssk. Turn the work (the “rows” will be joined later) and, with the wrong side facing you, yarn over, then continue across the next round, purling in your pattern, again ending just before the marked first stitch of the round.
P2tog to join the yarn over and this next stitch together. Repeat these two rounds, always working a yarn over as you start every new round and finishing with a p2tog or ssk, combining the last stitch of the round with the yarn over.
Connecting Ends of the Rounds Using a Fake Seam This technique uses a slipped stitch to give the appearance of a seam.
Try it the next time you’re knitting intarsia socks—you can use whatever cast-on you’d like, whether toe up or top down.
Just add one extra stitch at the end of the round, usually placed at the back seam of the garment.
To begin, cast on the number of stitches needed plus one. Place a marker on this extra stitch.
With the right side of the fabric facing you, work across the entire first round, including the extra stitch.
Turn, and with the wrong side facing you, slip the extra stitch purlwise, then work in your pattern across to end the round, ending the round by purling the extra stitch.
Turn, and with the right side facing you, slip the extra stitch purlwise, then work in your pattern across to end the round, ending the round by knitting the extra stitch.
Repeat these last two rounds, always slipping the extra stitch purlwise at the beginning of every round and knitting or purling it at the end of the round.
Connecting Ends of the Rounds Using a Pole Yarn
If your intarsia fabric is mostly background color with various contrast-colored motifs, try this method.
It utilizes a separate, freestanding piece of the background yarn, called a pole yarn, around which the working yarns are wrapped before turning at the end of each round.
To begin, knit along to the beginning of the round, then bring the working yarn around the pole yarn as you normally would when interlocking to twist yarns at any intarsia join, then turn and purl in the opposite direction, working the intarsia pattern.
At the end of each round, wrap the working yarn around the pole yarn before turning and continuing in the pattern.
color PLAY
When using the pole yarn method, be careful not to pull the pole yarn out by mistake; all your wraps will be lost, and your fabric will split apart at the join!

![]()