
Traveling Triangles Jacket
Tricot / Knitting
Don’t let the allover colorwork on this jacket scare you. Once you get the geometric pattern set up, it’s easily memorized.
Take care to begin and end each section of color with nice, long yarn tails—and be sure to darn them in during idle moments while watching TV or else the finishing of the project might take longer than the knitting!
NOTES
• The instructions include one selvedge stitch on each side, these stitches are not reflected in the finished measurements.
• Work all decreases inside the selvedge stitches. To maintain the intarsia pattern, on right-side rows, work k2tog at the beginning of the row and ssk at the end of the row, on wrong-side rows, work ssp at the beginning of the row and ssp at the end of the row.
• Work all increases inside the selvedge stitches. Use M1-L or M1-R in the color needed to maintain the intarsia pattern.
Make One Increase (M1, M1-L, or M1-R)
This method of increasing is the most invisible and perhaps the most useful one to have in your knitting repertoire. It can be made to slant toward the left (abbreviated M1-L) or toward the right (abbreviated M1-R). If the slanting direction is not specified, use the increase that slants left.
Used in combination, left- and right-slanting stitches can create beautiful, symmetrical sleeve increases.
To Make One slanting to the left (M1-L), use the left-hand needle to scoop up the horizontal strand between the needles from front to back and knit the strand through its back loop, twisting it to prevent a hole in your fabric.
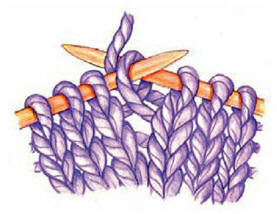
To Make One slanting to the right (M1-R), use your left-hand needle to scoop up the horizontal strand between the needles from back to front and knit the strand through its front loop, twisting it to prevent a hole in your fabric.
• When working the charts if only one or two stitches are worked in a separate color, do not use the separate color, instead, use the neighboring color for those one or two stitches.
• For sweater assembly, refer to the illustration for set-in sleeve construction.
SIZES
S (M, L, 1X, 2X, 3X).
Instructions are for the smallest size, with changes for other sizes noted in parentheses as necessary.
FINISHED MEASUREMENTS
Bust (buttoned): 36¼ (38¾, 42¼, 44¾, 48¼, 50¾)"/[92 (98.5, 107, 113.5, 122.5, 129)cm]
Hip (buttoned): 41¾ (44¾, 48¼, 50¾, 54¼, 56¾)"/[106 (113.5, 122.5, 129, 138, 144)cm]
Length: 35 (35½, 36, 36½, 36½, 37)"/ [89 (90, 91.5, 92.5, 92.5, 94)cm]

MATERIALS
Louet North America’s Brushed Mohair:
4-medium/worsted weight, 78% mohair/13% wool/9% nylon, each
approximately 1¾ oz/[50g] and 105 yd/[96m].

5 (5, 6, 6, 6, 6) hanks of Mermaid #75 (A),
2 (2, 3, 3, 3, 3) hanks of Strawberry #23 (B),
3 (3, 4, 4, 4, 4) hanks each of Ruby Rose #89 (C) and Clementine #62 (D)
Size 8 (5mm) circular needle
Size 9 (5.5mm) circular needle, or size needed to obtain gauge
Two stitch holders
Stitch markers
Blunt-end yarn needle
Eight 1"/[2.5cm] buttons (JHB International’s Moonshadow, Style #43144, were used on sample garment)
GAUGE
16 stitches and 22 rows = 4"/[10cm] in Stockinette Stitch with the larger needle.
To save time, take time to check gauge.
STITCH PATTERNS
Seed Stitch (even number of stitches)
Row 1 (RS): *K1, p1, repeat from * across.
Row 2: *P1, k1, repeat from * across.
Repeat Rows 1 and 2 for the pattern.
Stockinette Stitch (any number of stitches)
Row 1 (RS): Knit across.
Row 2: Purl across.
Repeat Rows 1 and 2 for the pattern.
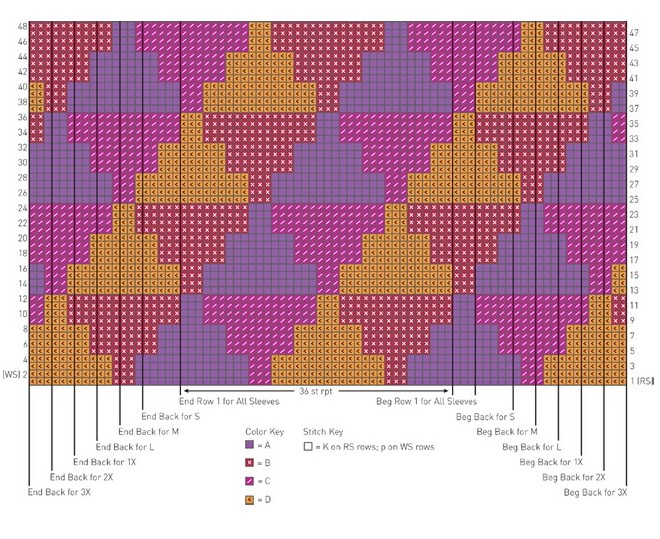
Triangles Pattern for Back and Sleeves See the chart.

Triangles Pattern for Left Front See the chart.
Triangles Pattern for Right Front See the chart.
Note:
Rather than working from bobbins, cut several 120"/[305cm] lengths of each color of yarn for each section of color in the charts.
Back
With the smaller needle and A, cast on 84 (90, 96, 102, 108, 114) stitches.
Work in Seed Stitch until the piece measures approximately 1½"/[3.8cm],
ending after a wrong-side row, increasing 1 stitch at the end of the last row—85 (91, 97, 103, 109, 115) stitches.
Change to the larger needle and Stockinette Stitch,
work the Intarsia Triangles Pattern for Back chart, beginning and ending where indicated for your desired size,
and decrease 1 stitch at each side every 22 rows 5 (4, 3, 2, 2, 1) time(s),
then every 24 rows 1 (2, 3, 4, 4, 5) time(s)—73 (79, 85, 91, 97, 103) stitches remain.
Work even until the piece measures approximately 27"/[68.5cm], ending after a wrongside row.
SHAPE ARMHOLES
Bind off 3 (3, 4, 4, 5, 6) stitches at the beginning of the next 2 rows, bind off 2 (2, 2, 3, 3, 4) stitches at the beginning of the next 2 rows—63 (69, 73, 77, 81, 83) stitches remain.
Decrease 1 stitch at each side every row 2 (3, 6, 5, 10, 8) times,
then every other row 4 (5, 4, 6, 3, 5) times—51 (53, 53, 55, 55, 57) stitches remain.
Work even until the armholes measure approximately 7 (7½, 8, 8½, 8½, 9)"/[18 (19, 20.5, 21.5, 21.5, 23)cm].
SHAPE SHOULDERS
Bind off 4 (4, 4, 5, 5, 5) stitches at the beginning of the next 4 rows, then bind off 4 (5, 5, 4, 4, 5) stitches at the beginning of the next 2 rows—27 stitches remain.
Bind off.
Pocket Linings
(Make 2) With the larger needle and A, cast on 21 stitches.
Work even in Stockinette Stitch until the piece measures approximately 6½"/[16.5cm], ending after a right-side row.
Cut the yarn and place the stitches on a holder.
Left Front With the smaller needle and A, cast on 46 (48, 52, 54, 58, 60) stitches.
Work in Seed Stitch until the piece measures approximately 1½"/[3.8cm], ending after a wrong-side row and increasing 1 stitch at the end of the last row—47 (49, 53, 55, 59, 61) stitches.
Pattern Set-Up Row (RS):
Change to the larger needle and Stockinette Stitch, beginning where indicated for your desired size, work Row 1 of the Intarsia Triangles Pattern for Left Front chart across the first 41 (43, 47, 49, 53, 55) stitches,
place a marker,
join A and work in Seed Stitch across the last 6 stitches for front band.
Working the patterns as established, decrease 1 stitch at the armhole edge every 22 rows 5 (4, 3, 2, 2, 1) times,
then every 24 rows 1 (2, 3, 4, 4, 5) time(s), at the same time, when the piece measures approximately 11"/[28cm], ending after Row 4 of the charted pattern,
place the Pocket Lining as follows:
Next Row (RS):
Work 13 stitches,
slip the next 21 stitches to a stitch holder for the pocket opening,
continue in the established pattern across the 21 stitches from 1 Pocket Lining, work to the end of the row.
When the decreases are complete, work even on the remaining 41 (43, 47, 49, 53, 55) stitches until the piece measures approximately 27"/[68.5cm], ending after a wrong-side row.
SHAPE ARMHOLES
Bind off 3 (3, 4, 4, 5, 6) stitches at the armhole edge once,
then bind off 2 (2, 2, 3, 3, 4) stitches at the armhole edge once—36 (38, 41, 42, 45, 45) stitches remain.
Decrease 1 stitch at the armhole edge every row 2 (3, 6, 5, 10, 8) times,
then every other row 4 (5, 4, 6, 3, 5) times—30 (30, 31, 31, 32, 32) stitches remain.
Work even until the armhole measures approximately 5 (5½, 6, 6½, 6½, 7)"/[12.5 (14, 15, 16.5, 16.5, 18)cm],
ending after a right-side row.
SHAPE NECK
Bind off 6 stitches at the neck edge once,
bind off 4 stitches at the neck edge once,
bind off 3 stitches at the neck edge twice—14 (14, 15, 15, 16, 16) stitches remain.
Decrease 1 stitch at the neck edge every row 2 (1, 2, 1, 2, 1) time(s)—12 (13, 13, 14, 14, 15) stitches remain.
Work even until the armhole measures approximately 6 (6½, 7, 7½, 7½, 8)"/[15 (16.5, 18, 19, 19, 20.5)cm].
SHAPE SHOULDERS
Bind off 4 (4, 4, 5, 5, 5) stitches at the armhole edge twice—4 (5, 5, 4, 4, 5) stitches remain.
Work 1 row even.
Bind off.
Place markers for 8 buttons along the Seed Stitch front band, placing the 1st marker ¼"/[6mm] from the top edge and the last marker 6"/[15cm] from the bottom edge.
Right Front
Work the same as for the Left Front except reverse all shaping,
and make 8 buttonholes on the right-side rows opposite the marked button positions on the Left Front as follows:
Buttonhole Row (RS):
K1, p1, bind off the next 2 stitches, work to the end of the row.
On the following row, cast on 2 stitches over the bound-off stitches of the Buttonhole Row.
Sleeves (Make 2)
With the smaller needle and A, cast on 38 stitches.
Work even in Seed Stitch until the piece measures approximately 1½"/[3.8cm],
ending after a wrong-side row and increasing 1 stitch at the end of the last row—39 stitches.
Change to the larger needle and Stockinette Stitch, begin working the Triangles Pattern for Sleeves where indicated in the chart.
Increase 1 stitch on each side every 8 rows 0 (0, 1, 6, 6, 11) time(s),
every 10 rows 0 (4, 8, 4, 4, 0) times,
every 12 rows 5 (4, 0, 0, 0, 0) times,
then every 14 rows 2 (0, 0, 0, 0, 0) times,
working new stitches into the charted pattern as they accumulate—53 (55, 57, 59, 59, 61) stitches.
Work even until the piece measures approximately 18½"/[47cm] from the beginning, ending after a wrong-side row.
SHAPE SLEEVE CAP
Bind off 3 (3, 4, 4, 5, 6) stitches at the beginning of the next 2 rows—47 (49, 49, 51, 49, 49) stitches remain.
Decrease 1 stitch at each side every other row 6 (7, 10, 12, 13, 16) times, then every row 9 (9, 6, 5, 3, 0) times—17 stitches remain.
Bind off 2 stitches at the beginning of the next 4 rows—9 stitches remain.
Bind off.
Finishing
Weave in all remaining yarn tails.
Block the pieces to the finished measurements.
Sew the shoulder seams.
COLLAR
With the wrong side facing, using the smaller needle and A, pick up and knit 64 stitches along the neckline, beginning and ending ¾"/[2cm] in from the front edges.
Work in Seed Stitch until the collar measures approximately 2"/[5cm].
Increase 1 stitch at each side every other row 7 times, working the new stitches in Seed Stitch—78 stitches.
Change to the larger needle, and increase 1 stitch at each side every 4 rows twice, working new stitches in Seed Stitch—82 stitches.
Bind off loosely.
POCKET EDGINGS
Slip the pocket stitches on hold from the stitch holder to the smaller needle.
With the right side facing and A, knit across.
Work in Seed Stitch for 1"/[2.5cm].
Bind off in pattern.
Sew the Pocket Linings to the wrong sides of the Right Front and the Left Front.
Sew the sides of the pocket edges to the right sides of the Right Front and the Left Front.
Set in Sleeves.
Sew the Sleeve and side seams.
Sew on the buttons at the marked positions.
SUGGESTED ALTERNATE COLORWAYS
Alternate Colorway 1, left: Louet North America’s Brushed Mohair in Buttercup #87 (A), Olive #41 (B), Clementine #62 (C), and Pomegranate #74 (D)
Alternate Colorway 2, right: Auburn #46 (A), Cream #30 (B), Desert #01 (C), Chestnut #53 (D)


![]()