
Gaylen’s Dress-Up Sweater
Tricot / Knitting
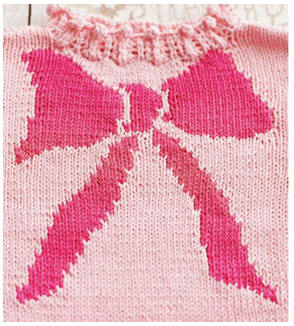
A big, sumptuous bow makes any gift special, so why not knit one into a pretty sweater for your favorite little princess?
Use the intarsia technique to place the motif front and center.
NOTES
• To increase stitches, use M1-R and M1-L. For right-slanting decreases, use k2tog, for left-slanting decreases, use ssk.
• For sweater assembly, refer to the illustration for square-indented sleeve construction.
Make One Increase (M1, M1-L, or M1-R)
This method of increasing is the most invisible and perhaps the most useful one to have in your knitting repertoire. It can be made to slant toward the left (abbreviated M1-L) or toward the right (abbreviated M1-R). If the slanting direction is not specified, use the increase that slants left.
Used in combination, left- and right-slanting stitches can create beautiful, symmetrical sleeve increases.
To Make One slanting to the left (M1-L), use the left-hand needle to scoop up the horizontal strand between the needles from front to back and knit the strand through its back loop, twisting it to prevent a hole in your fabric.
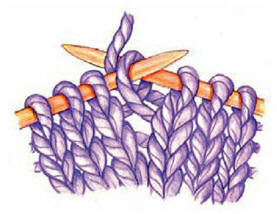
To Make One slanting to the right (M1-R), use your left-hand needle to scoop up the horizontal strand between the needles from back to front and knit the strand through its front loop, twisting it to prevent a hole in your fabric.
Bobble (B) Bobbles introduce surface texture to fabrics.
Though time-consuming to knit, they add a bit of whimsy and are not at all difficult. To make a bobble, work several stitches into a single stitch, increasing the number of stitches in that area from 1 stitch to 3, 5, or more. Work several rows on these new stitches, turning the work after each successive row. Finally, decrease the stitches back to the original single stitch.
SIZES
Child’s 2 (4, 6, 8).
Instructions are for the smallest size, with changes for the other sizes noted in parentheses as necessary.
FINISHED MEASUREMENTS
Chest: 26 (29, 32, 35½)"/ [66 (74, 80, 90) cm]
Total length: 14 (15, 16, 17)"/ [35.5 (38, 42, 43)cm]

MATERIALS
Classic Elite Yarn’s Provence: 3-light/DK weight, 100% mercerized cotton,
each approximately 3½ oz/[100g] and 205 yd/[187.5m].
3 (3, 4, 4) hanks of Bermuda Sand #2689 (A) and 1 hank of Rosa Rugosa #2625 (B)
Size 3 (3.25mm) knitting needles
Size 3 (3.25mm) 16"/[40cm] circular needle
Size 5 (3.75mm) knitting needles, or size needed to obtain gauge
Two stitch markers
Blunt-end yarn needle
GAUGE
22 stitches and 29 rows = 4"/[10cm] in Stockinette Stitch with the larger needles.
To save time, take time to check gauge.
STITCH PATTERNS
Border Rib Pattern (multiple of 6 stitches + 1)
Row 1 (RS): *K1, yo, k1, s2kp2, k1, yo, repeat from * to last stitch, k1.
Row 2: P2, *k1, p1, k1, p3, repeat from * to the last 5 stitches, k1, p1, k1, p2.
Repeat Rows 1 and 2 for the pattern.
Stockinette Stitch (any number of stitches)
Row 1 (RS): Knit across.
Row 2: Purl across.
Repeat Rows 1 and 2 for the pattern.
Bow Pattern (40 stitches)

Back
With the smaller needles and A, cast on 73 (79, 85, 97) stitches.
Row 1 (RS):
K3, *MB, k5, repeat from * to the last 4 stitches, MB, k3.
Next Row: P2, *k1, p1, k1, p3, repeat from * to the last 5 stitches, k1, p1, k1, p2.
Work in the Border Rib Pattern until the piece measures approximately 1½"/[3.8cm], ending after a wrong-side row.
Next Row (RS):
Change to the larger needles, begin working in Stockinette Stitch and decrease 1 (increase 1, increase 3, increase 1) evenly across the row—72 (80, 88, 98) stitches.
Work even in Stockinette Stitch until the piece measures approximately 7½ (8, 8½, 9)"/19 (20.5, 21.5, 23)cm], ending after a wrong-side row.
SHAPE ARMHOLES
Bind off 8 (10, 12, 14) stitches at the beginning of the next 2 rows—56 (60, 64, 70) stitches remain.
Work even until the armholes measure approximately 5 (5½, 6, 6½)"/[12.5 (14, 15, 16.5)cm], ending after a wrong-side row.
SHAPE NECK
Next Row (RS):
K14 (16, 17, 20), join a 2nd ball of yarn and bind off the middle 28 (28, 30, 30) stitches, knit to the end of the row.
Decrease 1 stitch at each neck edge—13 (15, 16, 19) stitches remain on each side.
Work even until the armholes measure approximately 5½ (6, 6½, 7)"/[14 (15, 16.5, 18)cm], ending after a wrong-side row.
SHAPE SHOULDERS
Bind off 3 (4, 4, 5) stitches at the beginning of the next 6 rows, then bind off 4 (3, 4, 4) stitches at the beginning of the next 2 rows.
Front
Work the same as for the Back until the piece measures approximately 3½ (4½, 5½, 6½)"/[9 (11.5, 14, 16.5)cm], ending after a wrong-side row.
Pattern Set-Up Row (RS):
K16 (20, 24, 29), place a marker, work Row 1 of the Bow Pattern over the middle 40 stitches, place a marker, knit to the end of the row.
Work even in the established pattern until the piece measures approximately 7½ (8, 8½, 9)"/[19 (20.5, 21.5, 23)cm], ending after a wrong side row.
SHAPE ARMHOLES
Continuing established pattern, bind off 8 (10, 12, 14) stitches at the beginning of the next 2 rows—56 (60, 64, 70) stitches remain.
Work even until the armholes measure approximately 4½ (5, 5½, 6)"/[11.5 (12.5, 14, 15)cm], ending after a wrong-side row.
SHAPE NECK
Next Row (RS):
K22 (24, 25, 28), join a 2nd ball of yarn and bind off the middle 12 (12, 14, 14) stitches, knit to the end of the row.
Working both sides at once with separate balls of yarn,
complete the Bow Pattern,
then continue with A only, and at the same time, bind off 6 stitches at each neck edge once,
then bind off 2 stitches at each neck edge,
then decrease 1 stitch at each neck edge once —13 (15, 16, 19) stitches remain on each side.
Work even until the armholes measure the same as the Back to the shoulders.
SHAPE SHOULDERS
Work the same as for the Back.
Sleeves (Make 2)
With the smaller needles and A, cast on 37 (37, 43, 43) stitches.
Row 1 (RS):
K3, *MB, k5, repeat from * to the last 4 stitches, MB, k3.
Next Row:
P2, *k1, p1, k1, p3, repeat from * to the last 5 stitches, k1, p1, k1, p2.
Work in the Border Rib Pattern until the piece measures approximately 1"/[2.5cm], ending after a wrong-side row.
Next Row (RS):
Change to the larger needles, begin working in Stockinette Stitch and increase 2 stitches evenly across the row—39 (39, 45, 45) stitches.
Increase 1 stitch at each side every 4 rows 0 (5, 3, 6) times, every 6 rows 9 (9, 11, 10) times, then every 8 rows 2 (0, 0, 0) times as follows:
K1, M1-R, knit to the last stitch, M1L, k1—61 (67, 73, 77) stitches when all shaping is complete.
Work even until the piece measures approximately 12¼ (13¼, 14, 15½)"/[31 (33.5, 35.5, 39.5)cm], ending after a wrong-side row.
Bind off.
Finishing
Weave in all remaining yarn tails.
Block all pieces to the finished measurements.
Sew the shoulder seams.
NECKBAND
With the right side facing, using the circular needle and A, pick up and knit 90 (90, 102, 102) stitches evenly spaced along the neckline, place a marker and join.
Round 1 (RS):
*K1, yo, k1, s2kp2, k1, yo, repeat from * around.
Round 2 (RS):
*K2, p1, k1, p1, k1, repeat from * around.
Repeat Rounds 1 and 2 until the neckband measures approximately 1"/[2.5cm], ending after Round 2.
Bobble Bind-Off:
Bind off, placing bobbles above the double decreases as follows:
Bind off 2 stitches, *MB, bind off 6 stitches (including the bobble), repeat from * around, ending the round with MB, then bind off the remaining stitches.
Set in the Sleeves.
Sew the Sleeve and side seams.

SUGGESTED ALTERNATE COLORWAYS
Alternate Colorway 1, left:
Classic Elite Yarn’s Provence in Zinnia Flower #2619 (A) and Sundrenched Yellow #2633 (B) Alternate
Colorway 2, right: Island Blue #2646 (A) and Bleach #2601 (B)


![]()