Knitting the Steek Stitches
I recommend nine-stitch steeks for the projects in this book, although Iíve seen successful sweaters worked with as few as three stitches in the steek.
For additional security, more stitches can be added. Using an odd number of stitches makes it easy to cut in the center of a column of stitches later. (Of course, if an even number of stitches were to be used, the steek would be cut between the two middle stitches.)
For the steek, a bridge of stitches is cast on using the e-wrap cast-on technique (see below) using alternating colors of yarn.
Frequent color changes in the steek, even at the cast-on edge, make the fabric sturdier and easier to cut, and help to prevent it from ravelling.
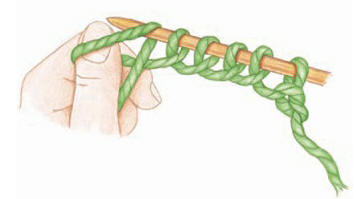
To create the e-wrap cast-on:
Wrap the yarn from front to back around your left thumb, then insert the right-hand needle from front to back to catch the strand.

As you knit, the steek stitches should be worked in a simple color pattern, either in the same vertical pattern already set up in the cast-on or else in a simple alternating check pattern.
Additionally, a stitch marker is often placed on either side of the steek stitches to set them off from the main knitting.
Working the steek stitches in a vertical stripe pattern is beneficial in two ways:
It will be a snap to cut a straight line up the center stripe, and it creates definite border stitches along the steek that will make picking up stitches much easier to do later.
For example, hereís a five-stitch steek worked in a vertical stripe pattern.

The cut will occur in the middle of the center green stitch. If you use a nine-stitch steek (as Iíve done for the projects in this book), the cut would occur in the middle of the fifth stitch of the steek.
When the steek stitches are no longer necessary (such as at the top of a garment), bind off the steek stitches before securing and cutting the steek.
color PLAY
Some knitters prefer to work all their steek stitches through the back loop. This technique twists the stitches, making them a bit tighteróand may create additional security. If youíre especially queasy, it canít hurt!
Steeks and Shaping
Steeks make it easy to knit straight tubes, but sometimes you want to shape circular-knit pieces, such as for a waistline or sleeve. Obviously, those increases and decreases must be made within the main fabric and not the steeks.
For an elegant, fully fashioned look, work your shaping one or two stitches before or after your steek stitches. This technique will create a subtle frame for your pieces and will make seaming or picking up stitches easier during the finishing stage of your project.
For an especially beautiful effect, slant your increases or decreases toward the steek and not in the direction of the slope of the fabric.
When decreasing, for example, work a k2tog decrease after the steek stitches, before steek stitches, work an ssk decrease.
When working your decreases this way, itíll be easy to determine which color yarn your decreases should be worked in to maintain the pattern. Bonus!
Securing the Steek
After the knitting has been completed for the garment, the steek edges are usually reinforced prior to cutting, either by crocheting or by sewing.
Crochet works for most fibbers, including wool and wool-blend yarns, while sewing may better secure projects worked in slippery or plant-based fibbers such as rayon or cotton.
When in doubt, test your preferred method for securing a steek on a swatch before doing it on your precious garment! Prior to securing the steeks, itís a good idea to wet-block the garment.
Washing the fabric evens out the stitches a bit, and when using a wool yarn, it is the first step in the felting process that stabilizes the fabric and prevents unravelling.
