
Fidchell English
Jeux
Rules One
This is not Fidchell proper, but is the game most players prefer, as it is simpler to get to grips with, faster moving and generally over in around half an hour.
Along the way it teaches most of the manoeuvre required for Game Two, which is best left until curiosity suggests trying a variation.
The object for both sides is to create a continuous (not necessarily straight) line of their own stones linking the center of the board to the outer circle. The first to succeed is the winner.
- 1 - The King or Navel Stone (the one larger than the rest) is first placed in the center of the board, where it remains throughout the game. It is dead to begin with and can be ignored until players start moving their pieces on the board.
- 2 - Either White (in the first instance) or the loser of the previous game goes first, players taking turns to place one stone at a time into vacant spaces. Each player starts with 27 stones or 'men'.
- 3 - An enemy piece is captured by trapping it between two of your own. That is, by making a pair immediately next to, and on opposite sides of a single stone, as indicated by the lines on the board.
- 4 - Capturing an enemy's piece grants you another turn. This can be repeated any number of times. Capturing more than one piece in one move, however, just grants you one more turn. Captured stones go out of play till the game's end.
- 5 - An empty space between two enemy pieces already on the board may be entered without harm, but you become vulnerable if one of those pieces is moved.
- 6 - When you run out of stones to place down, those on the board become free to move along any one line till they meet an obstruction (i.e. no turning onto other lines and no jumping over other pieces). Capture still entitles you to another move and all other rules remain in force, plus a new one that comes next:
- 7 - When either player starts to move their pieces, the King stone becomes alive to both of them as a friend, and can be used to capture opposing men.
TACTICS
Whoever goes first in this game begins with a slight edge of advantage, so the other player's priority is to frustrate the creation of their line.
But it is not enough just to block them, attacks must be tied in with the creation of your own line. The way to seize or hold onto the initiative is to force your opponent to concentrate more on your plan than their own.
For this a bluff often works as well as any real stratagem. Below are shown two configurations useful for creating no-go areas for the opposition. That is, groups of empty spaces which they cannot enter without immediately being taken.

In configuration a) the only time your opponent can enter either of the empty spaces without being taken is in the final, winning move of the game.
When doubled up along one of the quarter-lines, this arrangement can secure a straight path to the circumference with only three stones. Filling the gaps does present problems, however, particularly when your opponent sets up the same configuration at right angles across it.
Configuration b) is far stronger when planted in an otherwise clear sector. In general the best way to counter it is by not giving your opponent time to fill the gaps.
The innermost ring can present a problem if one player manages to set up the arrangement shown below, because their opponent cannot enter either empty space without being taken.
In effect, configuration c) is configuration a) bent into a ring.
But, you can enter either space if it completes a line to the circumference.
For this reason it can even be a useful gambit - letting your opponent secure the inner circle puts you one step ahead in securing the outer circles, but unless you know what you are doing it is safest to put one of your pieces in that ring as soon as your opponent does.
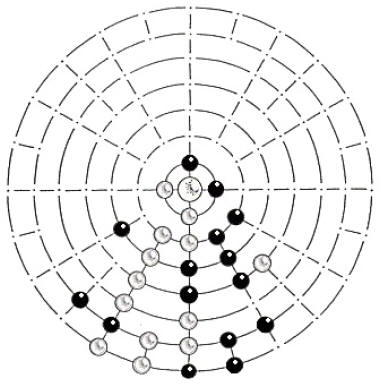
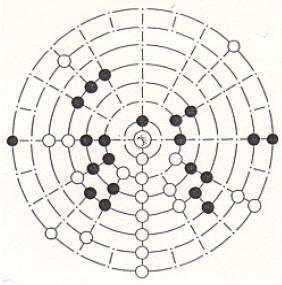
An example of a win by White.
It doesn't matter how convoluted a winning line is, so long as it is continuous. In this game Black has managed to create quite a strong line of its own, but failed in the end to seize the initiative.
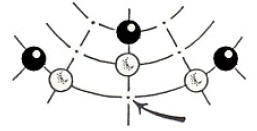
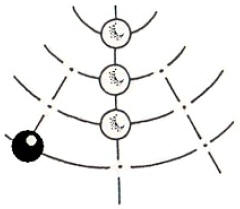
| By entering the arrowed space Black takes three White pieces in one go, but only gains one fresh turn. | Here is shown a useful way Black can deflect White's advance to the edge. |
 |
 |
Rules 2
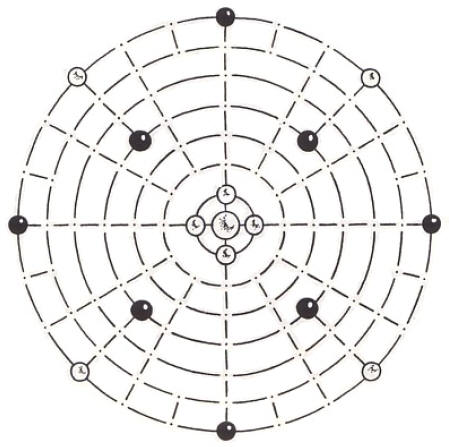
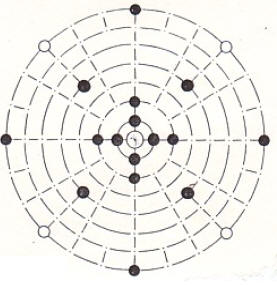
Opening layout
(For completeness, some of the rules from Game 1 are here repeated.)
- 1 - At the outset, the King or Navel Stone (the piece larger than all the rest) is placed in the centre of the board, where it remains throughout the game. Then eight White and eight Black stones are placed according to the Opening Layout diagram above.
- 2 - Players decide colors and White goes first. Thereafter, the colors alternate between the players.
- 3 - In the first stage, players take turns to place a stone at a time into the vacant holes. When all a player's 27 stones have been placed, those on the board become free to move along any one line. No turning onto other lines, no jumping over pieces and no doubling back on yourself.
- 4 - White's aim is to create a continuous (not necessarily straight) line of stones linking the Navel Stone to the circumference.
- 5 - Black's aim is to force White to resign, either by decisively cutting off the center, or by reducing White's strength to less than seven stones (the minimum needed to win).
- 6 - When challenged to resign, White must either win outright or capture a Black stone in the next five moves. If the challenge is defeated by a capture, White may remove any two Black stones from the board before taking the next turn.
- 7 - An enemy piece is captured by trapping it between two of your own. That is, by making a pair immediately next to, and on opposite sides of a single stone, as indicated by the lines on the board.
- 8 - Capturing an enemy's piece entitles you to another turn. This can be repeated any number of times.
- 9 - You may enter the space between two enemy pieces on the board without harm, but if one of them is moved you become vulnerable to attack.
- 10 - Captured stones go out of play till the game's end.
- 11 - The Navel Stone is considered as White until Black's pieces start to move on the board, after which it counts as either color for capturing stones in the inmost circle.
- 12 - In the first stage of the game, players must display all their pieces, or show them on demand.
TACTICS
GENERAL
For experienced players there is no particular advantage in being either White or Black, but the balance of power does shift in the course of the game and both sides need to bear this in mind. In the first stage, when players are setting their pieces on the board, White has a definite advantage.
Even if an outright win is not possible, White should make the most of this to keep Black on the run and set things up for the second stage.
In the transition from first to second stage, the advantage briefly goes to the side that still has pieces in hand to place on the board. For this reason, wholesale massacres of your opponent in the early stages need to be handled carefully, they tend to backfire at this point.
In the second stage, when both players' pieces are moving on the board, the underlying advantage passes to Black for a while.
In the absence of any bold plan, White's best bet is to consolidate avenues to the circumference and avoid losing pieces. Thereafter the balance of power steadily evens out and the initiative belongs to whoever is bold enough to seize it.
WHITE
The goal for White is the same as in Game One, but you will find a slightly different strategy required because now all Black's energy is focused on blocking you.
White's main aim should be to secure several lines across the third, fourth and fifth rings, because these are the easiest for Black to secure. Then the offensive can be switched from one line to another.
Towards the end of the first stage, White should check the safety of its pieces in the innermost ring. As soon as Black starts moving its pieces on the board it can use the Navel Stone to take them.
It is easier for White to win outright in the first stage, but an experienced Black player will find ways of preventing it. The first stage is then best used to set the scene for the second.
With experienced and evenly matched players this game can last for several hours.
BLACK
Black's first aim should be to stop White establishing strong lines across the third, fourth and fifth rings.
For new players this will seem a harder task than White's, and it is, but there are several standard moves which, once grasped, will nearly always ensure that the game goes through to the second stage.
Then Black has the advantage for a while. The first reward for Black on reaching the second stage is that it can use the Navel Stone to attack White's pieces in the first circle. If White has forgotten this (as often happens), the result can be devastating.
Then, if the inner and middle rings are reasonably secure, it is not a bad idea to set about just capturing as many stones as possible till some pattern emerges.
White usually recognizes defeat without having to be challenged. In cases of stubbornness Rule 6 can be invoked, but you must be very sure of what you are doing. The price of a failed challenge is usually victory for White.
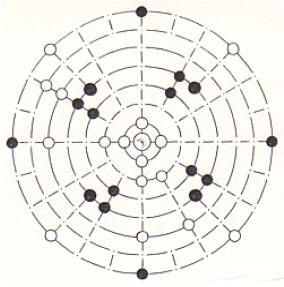
| An example of a win by White in the second stage of Fidchell. The winning line is not often this straight and the course of the preceding game was more devious than the outcome suggests. | In this game White has carelessly let Black turn the third and fourth circles into complete no-go areas in only eight moves. In the second stage of the game this would be fatal for White. Coming at the beginning like this, however, it is merely a great inconvenience. |
 |
 |
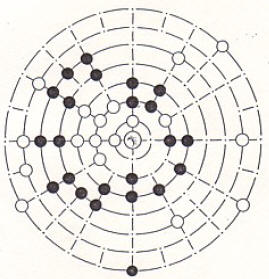
| An example of
a win for Black in the second stage of the game. Although White still
has more than enough pieces on the board, Black has barricaded the
center with an impenetrable wall whose only gap is irrelevant. Defeat often takes a while to dawn on White, leaving Black to decide when to challenge for a resignation. Caution is needed though, as a premature challenge can be disastrous. A common mistake by Black at the end is forgetting that it needs at least one piece on the board which can be moved without danger or disruption to the barricade, even if it is only moved back and forth between two adjacent spaces. |
One of the
cheapest ways for Black to win is by capturing and securing the
innermost circle. At the other extreme would be Black's complete
occupation of the outer circle. Neither is very likely in practice as Black's barricade is rarely more circular than White's radial lines are straight. |
 |
 |
Fidchell Board


![]()