Double-Knitting Techniques
When knitting double-knit fabrics, both sides of the fabric are worked at once, with all the stitches for the side of the fabric facing you (Side 1) to be knit and all the stitches for the side away from you (Side 2) to be alternately purled.
Think of the stitches as being grouped in pairs:
A knit stitch always is followed by a purl stitch. Because both colors move back and forth with each stitch and share space on the needles, the stitches tend to spread and become larger than usual.
Therefore, the gauge for double knitting is usually looser than the gauge for regular stockinette stitch—even when two identical swatches are knitted with the same yarn and needles.
When double-knit fabrics aren’t knit tightly enough, a “grin through”—little blips of the color that show through from the layer beneath—may result.
To counter this tendency, most knitters go down a needle size or two in order to get an attractive, tightly knit fabric. Of course, as in all knitting, use whatever size knitting needles you require to match the gauge called for in a pattern.
To create double-knit fabric:
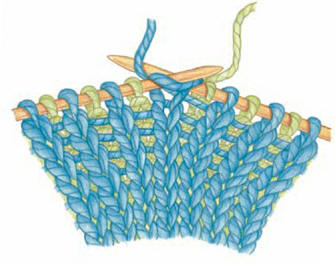
Start on Side 1 (Row 1) with both colors of yarn in back of your work. For the first stitch, knit a stitch with color A (illustration).
Then bring both colors of yarn to the side facing you, and cross them over each other before working the second stitch of the pair. This will lock the sides together as you work. Purl a stitch with color B (illustration).
Continue this way all across the row, alternately knitting one stitch with color A and purling one stitch with color B, then turn your work.
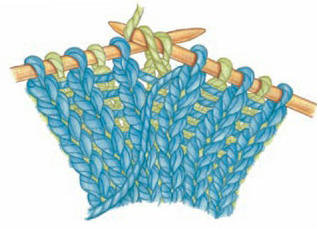
Side 2 (Row 2) is worked the same way as Side 1, but alternately knit the B stitches and purl the A stitches as follows (illustrations).


For Side 2:
Begin with both colors of yarn in back of the work, and knit one stitch with color B.
As before, bring both colors of yarn to the front, and cross them over each other before purling the second stitch with A.
This will lock the sides together as you work.
Continue this way all across the row.
Repeat these two rows:
On Side 1 alternately knit one stitch worked with A and purl one stitch worked with B,
On Side 2 alternately knit one stitch worked with B and purl one stitch worked with B.
NOTE:
Be sure to always bring both yarns between the needle tips to the front or back as you knit and purl. If you inadvertently separate the yarns when moving back and forth, the errant strand will show as a horizontal float on one of the layers.
color PLAY
Crossing the two yarns after the first knit stitch of the row rather than at the beginning of the row prevents visible twists along the edge of the fabric. Plus, if you’re making a project that will have seams (such as a reversible vest), your selvedge stitches will be less bulky, making seaming easier.
GIVING DOUBLE KNITS THE SLIP
For knitters with extra time on their hands (or for those who prefer to work with only one yarn at a time), there’s another method of working double knitting: slip stitches.
A knitter using the slip stitch method creates one layer of the fabric at a time while slipping the stitches for the other layer. On each row, you knit or purl the stitches that were slipped on the prior row and slip the stitches that were worked.
With this method, it takes two passes on the needles to complete one row on both layers.
A circular needle or double knitting needles must be used, since you must slide the stitches back to the beginning of the rows to work all the slipped stitches from the previous “pass” across the needle.
Needless to say, it takes twice as long to knit. Guess which method I prefer?
To use the slip stitch method:
For the first row, with Side 1 facing you, knit one stitch with color A, then slip the next stitch purlwise with the yarn in front.
Continue to alternate knitting and slipping stitches according to your pattern until you reach the end of the row.
Do not turn.
Slide the stitches back to the opposite side of the needle to begin the second pass, and with Side 1 still facing you, alternately slip the knitted stitches (from the previous pass) purlwise with the yarn in back and purl the slipped stitches with color A until you reach the end of the row.
Turn your work.
For the third and fourth rows, begin with Side 2 facing you.
Alternately knit (or purl) and slip stitches using color A for Row 3, slipping stitches purlwise with the yarn in back, and color B for Row 4, slipping stitches purlwise with the yarn in front. Repeat from the first row as necessary for your pattern.
Shaping in Double-Knit
Fabrics Stitches can be increased and decreased in double-knit fabrics, but take care to add and take away stitches from both sides of the fabric.
For increases, work an increase into both paired stitches, and for decreases, slip the paired stitch to a cable needle so that you can knit (or purl) together stitches of the same side. Voilà!
The increases and decreases are leaning in the same direction on their respective sides of the fabric.
Increasing Stitches I like to use the M1 Increase to add stitches to double-knit fabrics because it is the most invisible method.
As with all M1 Increases, the stitches can slant to the left or right for more refined shaping.
For an M1 Increase:
With both yarns in back, scoop up the horizontal strand that is between the last knit stitch you worked and the next knit stitch from front to back. Knit into the back of this strand with the appropriate color, twisting it to prevent a hole.
For the second increased stitch of the pair, bring both yarns to the front, insert the tip of your left-hand needle from back to front under the horizontal strand that is between the last purl stitch you made and the next purl stitch.
Purl into the front of this strand with the appropriate color to create the new stitch.
NOTE:
This method makes an M1-R Increase on both sides of your double-knit fabric.
To make an M1-L Increase (that slants to the left):
For the first increased stitch of the pair, scoop up the horizontal strand from back to front and knit it into the front leg; for the second increased stitch of the pair, scoop up the strand from front to back and purl it through its back loop.
Decreasing Stitches
Decreasing stitches on double-knit fabrics requires some preparation.
The stitches must be set up so that two knit stitches and two purl stitches sit next to each other on the needle.
Then common techniques such as k2tog and ssp for right-slanting decreases and ssk and p2tog for left-slanting decreases can be used.
To set up the stitches:
Slip the knit stitch of the pair of stitches to be decreased purlwise from the left-hand needle to the right-hand needle.
Slip the purl stitch of the pair to a cable needle purlwise and hold it to the back.
Slip the next knit stitch purl-wise to the right-hand needle.
Slip the purl stitch from the cable needle back to the left-hand needle, taking care not to twist it.
Slip the two knit stitches from the right-hand needle back to the left-hand needle.
Four stitches have now been rearranged, with two knit stitches next to two purl stitches.
Decreases can now be worked slanting either to the left or to the right for both layers of the fabric as follows.
For a right-slanting decrease:
For the first stitch of the pair, use a k2tog decrease.
With both yarns in back, insert the tip of your right-hand needle into the two knit stitches knitwise and knit them together with the appropriate color yarn.
To decrease the second stitch of the pair, use an ssp decrease.
Move both yarns to the front, slip the two purl stitches knitwise, one at a time, to the right-hand needle.
Then slip them back to the left-hand needle, maintaining their twisted position.
Insert the tip of the right-hand needle through the back loops of the two purl stitches (going into the second stitch first), and using the appropriate color yarn, purl them together.
For a left-slanting decrease:
For the first stitch of the pair, use an ssk decrease.
With both yarns in back, slip the two knit stitches knitwise, one at a time, to the right-hand needle.
Then insert the tip of your left-hand needle into the stitches and knit them together from this position with the appropriate color yarn.
To decrease the second stitch of the pair, use a p2tog decrease.
Move both yarns to the front, insert the tip of the right-hand needle purlwise into the two stitches, and purl them together with the appropriate color.

![]()