Engineering materials and their properties
Metals and alloys
The term metal dates back thousands of years. In fact, metals have been used for so long a time that little is known about the exact origin of the term.
We can define metals as belonging to a class of chemical elements such as iron, gold, and aluminum. Pure metals are too soft, or too weak to be used successfully for machine parts.
A material known as an alloy, which is often much harder than the pure metal, is usually substituted.
An alloy (such as steel, cast iron, brass, and bronze) is a mixture of metals or of metals and other chemical elements. Alloys are used to obtain certain desirable qualities not obtainable from pure metals.
Metals and alloys have certain behavior characteristics or properties which will be discussed in this section.
The material to be used for each part of a machine or structure must be carefully selected in order to obtain the desired properties.
The machine draftsman must learn as much as possible about the behavior of engineering materials so he can make an intelligent choice of the most suitable material for machine parts being drawn, whenever the materials are not already specified.
Metallurgy is the art and science of separating metals from their ores and preparing them for use. The metallurgist studies the behavior characteristics of metals and alloys. In most present day industries, metallurgists and designers often work together to select the metals and alloys for machine parts.
Properties of metals and alloys
In the preparation of drawings of machines and their parts, the machine draftsman needs to have a general knowledge of the common properties of some of the more important engineering materials.
Small samples of materials are tested by metallurgists so they can predict how parts made from these materials will behave in actual use. The results of these tests guide the designer and draftsman in their selection of suitable materials for machine parts.
The composition of certain metals and alloys regulates the mechanical, chemical, and electrical properties of the materials. By composition we mean the mixture of the various elements, or ingredients, of a material.
The addition of a very small amount of some elements often has a great effect upon the behavior of metal parts.
Strength and plasticity
Engineers and designers consider strength and plasticity to be the most important combination of properties a metal can possess.
Strength is the ability of a material to resist deformation. Deformation is the disfigurement, or changing of shape, of a part by external forces.
Plasticity is the ability of materials to withstand deformation without breaking. In general, hardened metals have high strength but low plasticity. The process of hardening often makes the metal brittle.
Plasticity may therefore be considered the exact opposite of brittleness.
Ductility
The term which describes the plasticity of a material when stretched is the ductility of the material. Ductility is an important property in wire drawing. Wire drawing is a method of manufacturing wire by pulling continuous rods through small openings in dies.
Malleability
Malleability is the term which describes the plasticity of a material when it is compressed. Heat increases malleability of thick metals.
Brittleness
Materials which break with little or no plastic deformation are described as being brittle. This property is exactly opposite to the property of plasticity. In general, a hardened metal is considered brittle.
Elasticity
The ability of a material to return to its original shape after being stretched or squeezed is called elasticity. Elastic materials are said to be flexible.
Fusibility
The temperature at which metals and alloys melt is the fusibility of the material. Fusibility is an important consideration in casting or in welding metals.
For example, it is important to know at what temperature certain combinations of brass, lead, and tin solders melt.
Toughness
A material which possesses high strength and malleability has the property of toughness. A tough metal is said to be highly shock resistant.
There is no direct or accurate
method by which the toughness of a metal can be measured. A metal that possesses
high strength but is not malleable is not tough.
shock resistance
The ability of materials to withstand repeated blows is called shock resistance.
Fatigue limit
The stress, measured in pounds per square inch, at which a material will fracture, or break, under repeated applications of a load is the fatigue limit of the material. Engineers perform tests on certain metal parts before installing them in place, in order to determine the load at which the part will break.
Not only is the load of importance to design engineers but also the number of applications of the load before the part breaks.
Resistance to corrosion
Some metals, like gold and platinum, have the ability to resist atmospheric and chemical attack by corrosion. Other metals, like iron, may corrode, or rust, very readily. Potassium actually catches fire when in contact with water.
Corrosion on metal parts may be identified by a gain of weight (due to the formation of a heavy coating of rust), a loss in strength, or a damaged appearance. Iron and steel parts are often protected from corrosion by a thin coating of zinc or tin.
Conductivity
Conductivity is the property which permits materials to transmit heat or electricity.
Electric conductivity
Metals are classed by their ability to carry electric current. Copper, aluminum, and silver have high electric conductivity.
Electrical resistance
Lead, for example, is often used because of its ability to resist the flow of electric current. The resistance of lead is about ten times that of copper.
Metallic luster
The capacity of a material for taking a polish is the metallic luster of the material.
Hardness
In general, strong metals are usually classed as hard. Metals having the property of hardness resist becoming permanently deformed when a load is applied. It should be noted that strength and hardness are not synonyms because a metal can be hard and brittle or hard and strong.
Heat-treating metals and alloys
A variety of processes involving the heating and cooling of most engineering metals is referred to by the term heat-treating. Materials are heat-treated for the purpose of obtaining certain desirable conditions or properties.
Steel is by far the most common material to be heat-treated. The selection of the type of heat-treating process for a given steel part depends upon the properties required. The following terms apply to the heat-treating processes used for steel and other metals.
Quenching
The process of cooling by immersing hot materials in liquids such as water or oil is known as quenching. In special cases materials may be quenched in air or in solids such as sand, lime, or asbestos rather than in liquids. Quenching in water cools materials rapidly, while quenching in air is at a slow rate. The rate used depends on desired results.
Hardening
Heating and quenching materials for the purpose of developing strength is called hardening. Steel, for example, has its highest strength when it is in its hardest condition.
Tempering
Following the hardening process, steel parts are often reheated for a certain length of time and allowed to cool by air. This process is known as tempering.
In the shop, it is often referred to as drawing. Hardened steels are sometimes harder than necessary and, as a result, often lack the required toughness. Tempering, increases toughness, removes some of the brittleness, decreases hardness, and relieves stresses.
Annealing
The process of annealing consists of heating and then slowly cooling a material. The principal reason for annealing is to soften the metal, making it easier to shape or machine the part.
After machining, some hardened parts (such as castings, forgings, and welded parts) may warp and become inaccurate for use. Warping is due to internal stresses caused by uneven cooling and shrinking.
Annealing removes the undesirable internal stresses. It is interesting to note that stresses may often be partly removed by simply storing the parts at room temperature. However, the process may require many months to produce results, whereas annealing will soon remove the stresses.
Normalizing
Heating metal parts and then allowing them to cool in air is called normalizing. Normalized parts will not be as soft as annealed parts. In most cases, however, stresses will be satisfactorily removed. Normalizing also improves machineability.
Case hardening metals and alloys
Those hardening processes which affect only a thin layer of the outer surfaces of the metal are called case hardening. In these processes the outer layer is allowed to absorb carbon or nitrogen, thereby increasing its hardness.
The hardened outside surface is called the case. The remaining inner portion not affected by the increase in carbon or nitrogen content is called the core. Common case hardening processes include pack carburizing, liquid carburizing, and nitriding.
Pack carburizing
Perhaps the oldest and best known of the case hardening processes, pack carburizing consists of placing metal parts in a heat resisting steel-alloy container which holds a carburizing compound rich in carbon.
The sealed box with its contents is placed in a furnace which has been heated to a suitably high temperature. The carbon gradually diffuses, or becomes absorbed into the surface of the steel.
After a suitable time the parts are removed from the box and are promptly quenched, thus forming a hard case. Pack-carburized parts are usually quenched in water, in oil, or in a brine (a solution of salt and water). The rate of penetration and the thickness of the case vary. A rate of 0.006 inch per hour is average.
Liquid carburizing
Steel parts can be case hardened by heating them to a suitable temperature while they are immersed in a sodium-cyanide liquid bath. This process is called liquid carburizing.
In 15 to 20 minutes, a case thickness of approximately 0.005 inch may be obtained. When the desired penetration has been reached, the parts are removed from the bath and quenched in water or in brine.
Nitriding
Nitriding consists of placing metal parts in a furnace which has been heated to a suitable
temperature and then passing ammonia gas through the chamber containing the metal parts. The ammonia gas, rich in nitrogen, develops nitrogen compounds on the surface of the steel.
After exposure, the steel is allowed to cool slowly to room temperature. The nitriding process requires from 18 to 90 hours to obtain a shallow case depth.
The process results in less warping of the parts and it produces a higher degree of surface hardness than that obtained by other case hardening processes. Valve stems for automobile engines are usually hardened by nitriding.
Selective, or localized, carburizing
Some parts may require hardening on only a few of the surfaces with all other surfaces left soft. There are two methods for doing this.
One method is to coat the surfaces which are to remain soft with a special compound which prevents penetration by the hardening agent. After hardening, the protected area may be easily machined. Surfaces may also be protected by copper-plating. The protected areas are deplated after hardening.
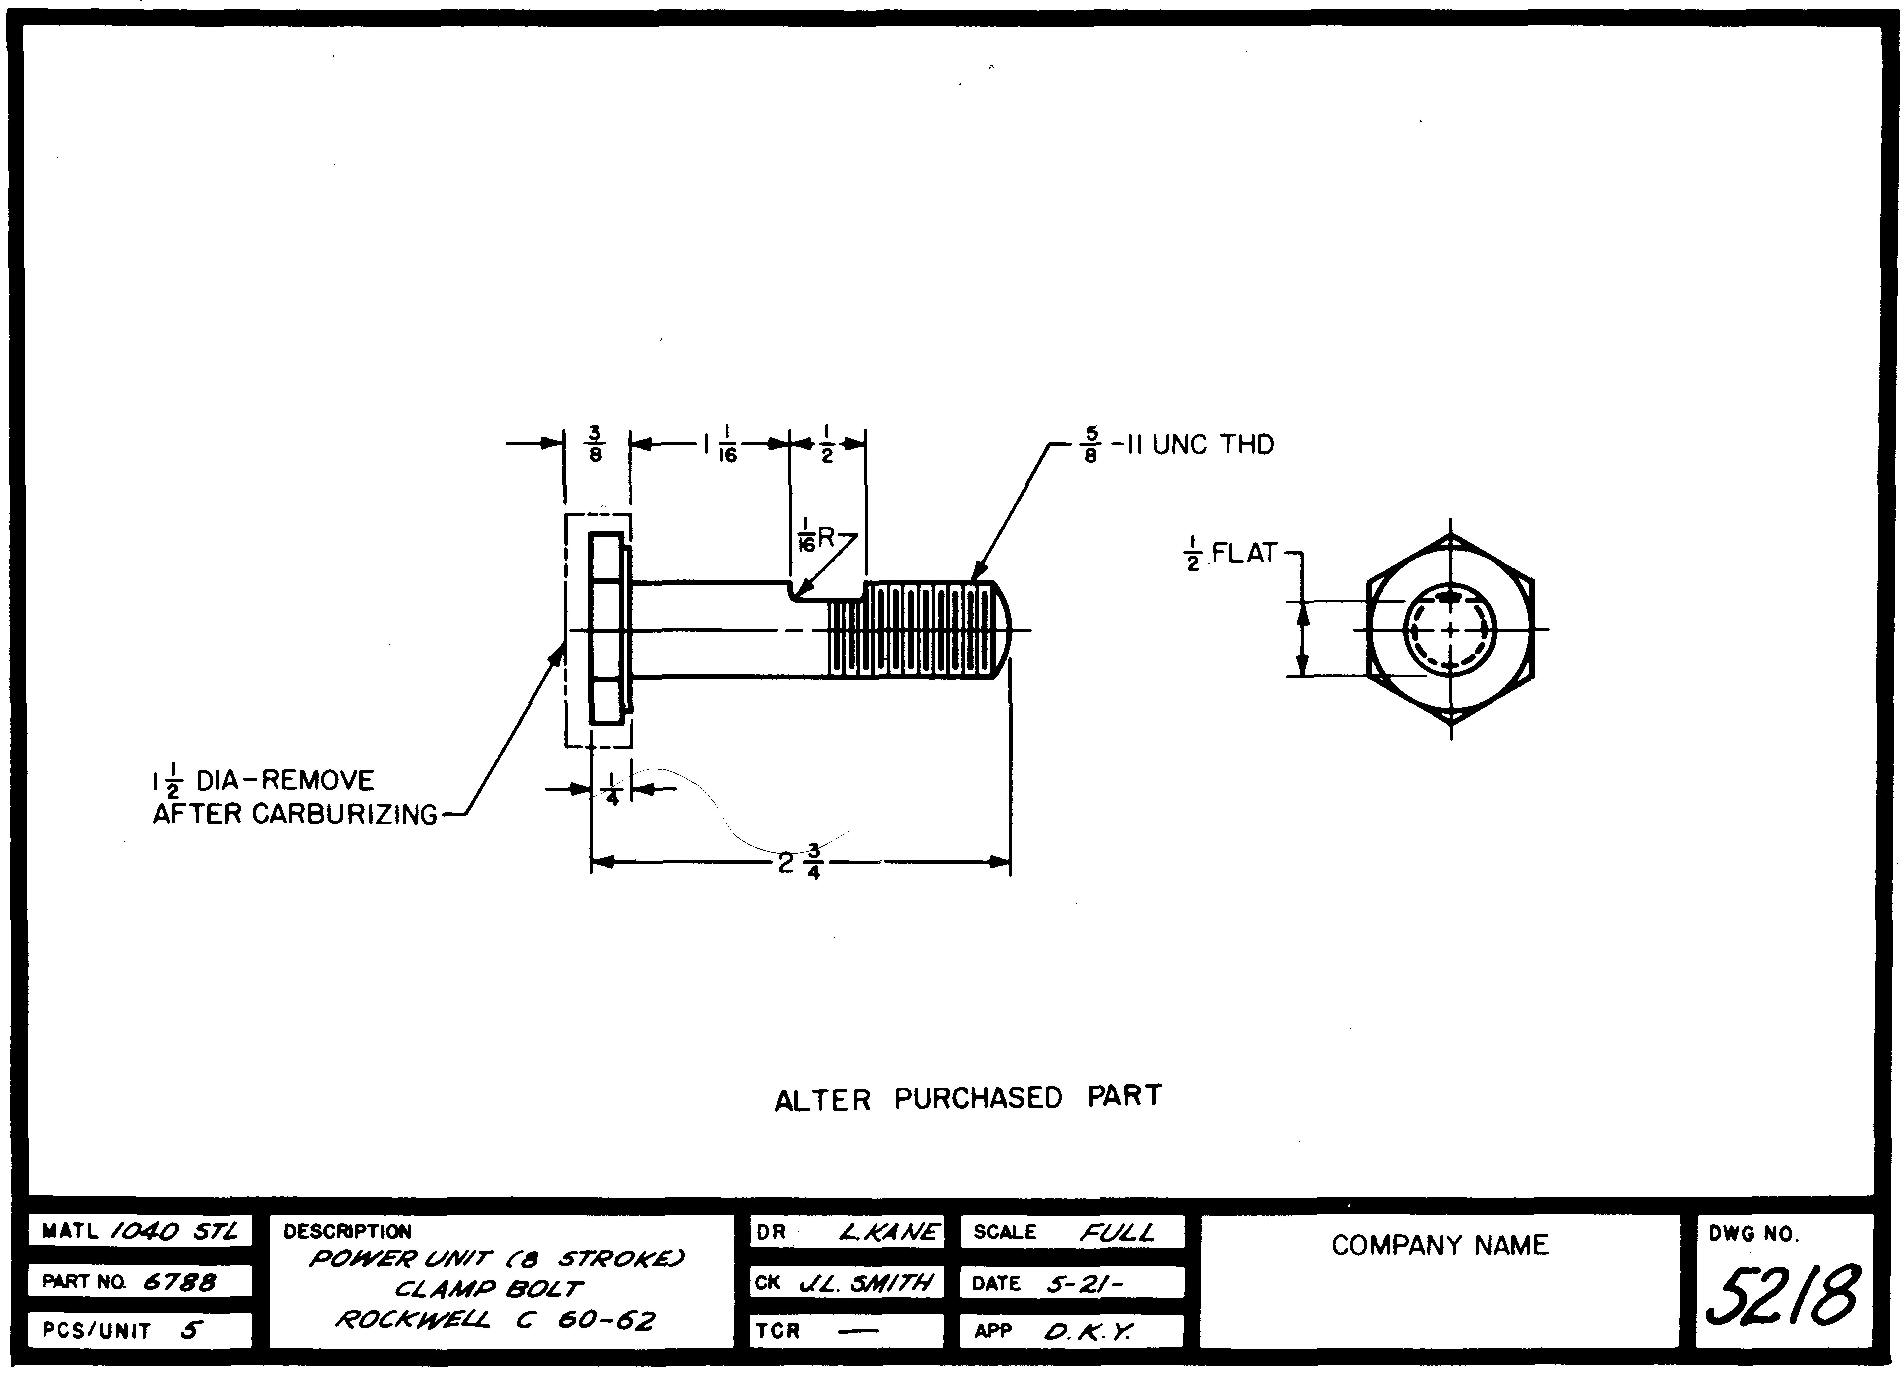
A second method of selective hardening is to provide extra stock around areas which are to be left soft, as shown in Fig. 9-1. The part is machined to final size by removing the excess stock after carburizing but before the hardening quench.
Fig. 9-1. A detail drawing

Flame hardening
The process of heating surfaces of machine parts with an oxyacetylene flame followed by quenching either in water or in compressed air is known as flame hardening.
The parts are hardened to a degree which is similar to the hardness of parts which were hardened in a furnace. The depth of hardness produced generally varies from 1/8 inch to 1/4 inch.
In special applications, the depth of hardness may be as deep as one inch. Flame hardening is used extensively for hardening rail ends to counteract the battering action of the railway car wheels at the rail joints.
Gear teeth and the working surfaces of cams and shafts are often hardened by this process. Flame hardening may be done manually or mechanically.
Hardness testing
Shop men often refer to steel as being file hard when it cannot be easily filed, or glass
hard when an edge of a steel part will produce a scratch on a piece of glass. However, modern-day industry requires a more accurate measurement of hardness.
The Brinell hardness test
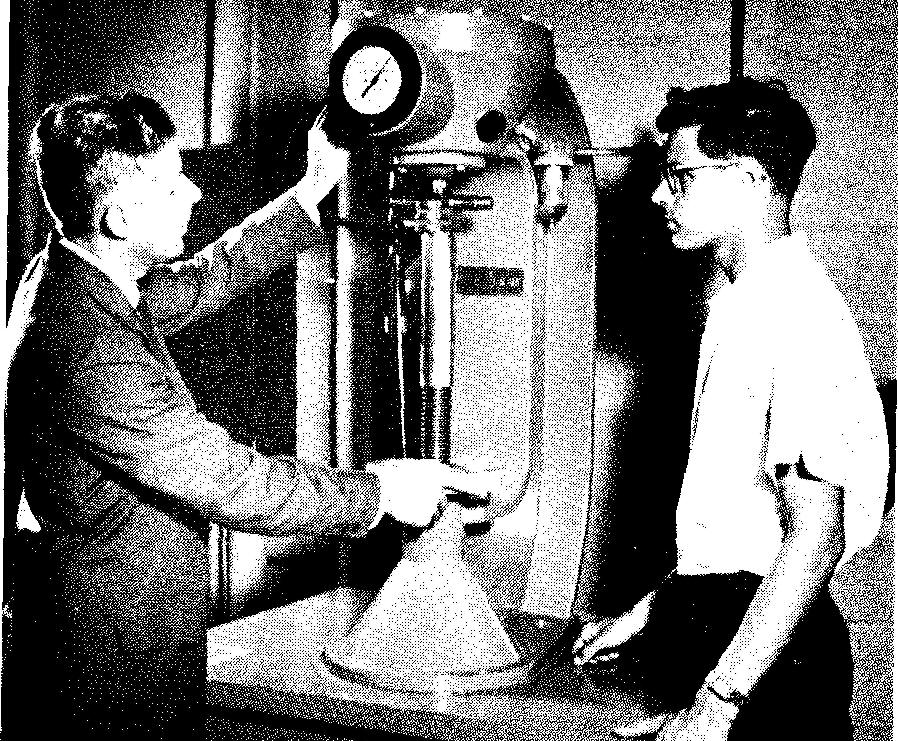
One method used to determine accurately the hardness of metals is the Brinell hardness test. The test measures the resistance of a metal to penetration by a hardened steel ball pressed into the surface of the metal under a given load.
A small microscope is used to measure the impression. Tables are used which convert the values for the load and the area of the impression to hardness readings.
Figure 9-2 shows a Brinell hardness tester.
Fig. 9-2. A Brinell hardness tester
The Rockwell hardness test
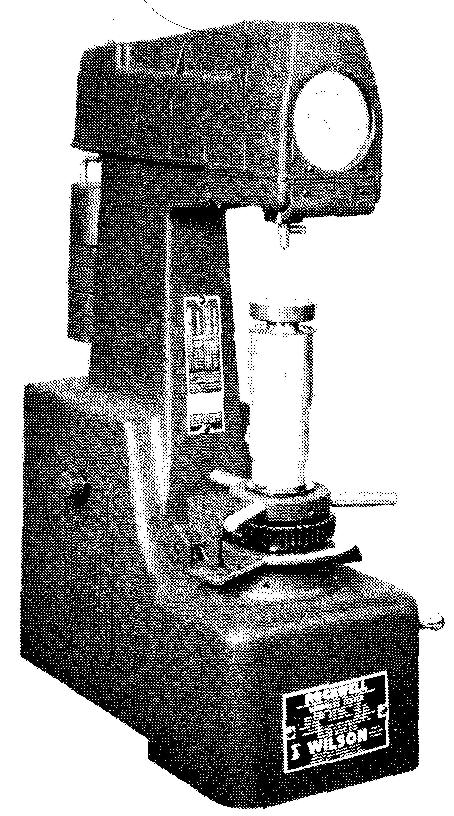
The test which measures the depth of impression caused by pressing a small hardened cone or a steel ball into the surface of the metal under a given load is known as the Rockwell hardness test.
The Rockwell tester, shown in Fig. 9-3, can perform hardness tests very rapidly. The hardness value may be read directly on the scale which is attached to the machine.
Fig. 9-3. A Rockwell hardness tester
The Shore scleroscope
Figure 9-4 shows the Shore scleroscope which is also used to determine metal hardness.
Fig. 9-4. A Shore scleroscope hardness tester
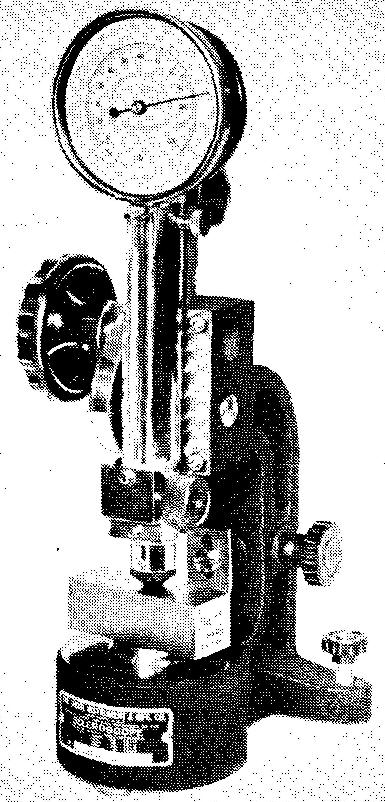
This tester measures the height of rebound (or bounce) of a special diamond-tipped hammer after it has been dropped on the surface of a specimen. The hammer falls from a height of 10 inches. The harder the material, the higher the rebound. Hardness numbers for various heights of rebounds have been assigned.
The 136° diamond pyramid hardness method
This method, also known as the Vickers method, is similar to the Brinell test. A diamond-pointed tool called the indenter has an angle of 136° between the faces. The indenter is pressed into the material being tested.
The load is removed and the resulting impression is measured. The hardness number is found by dividing the weight of the load by the surface area of indentation.
Hardness conversion table
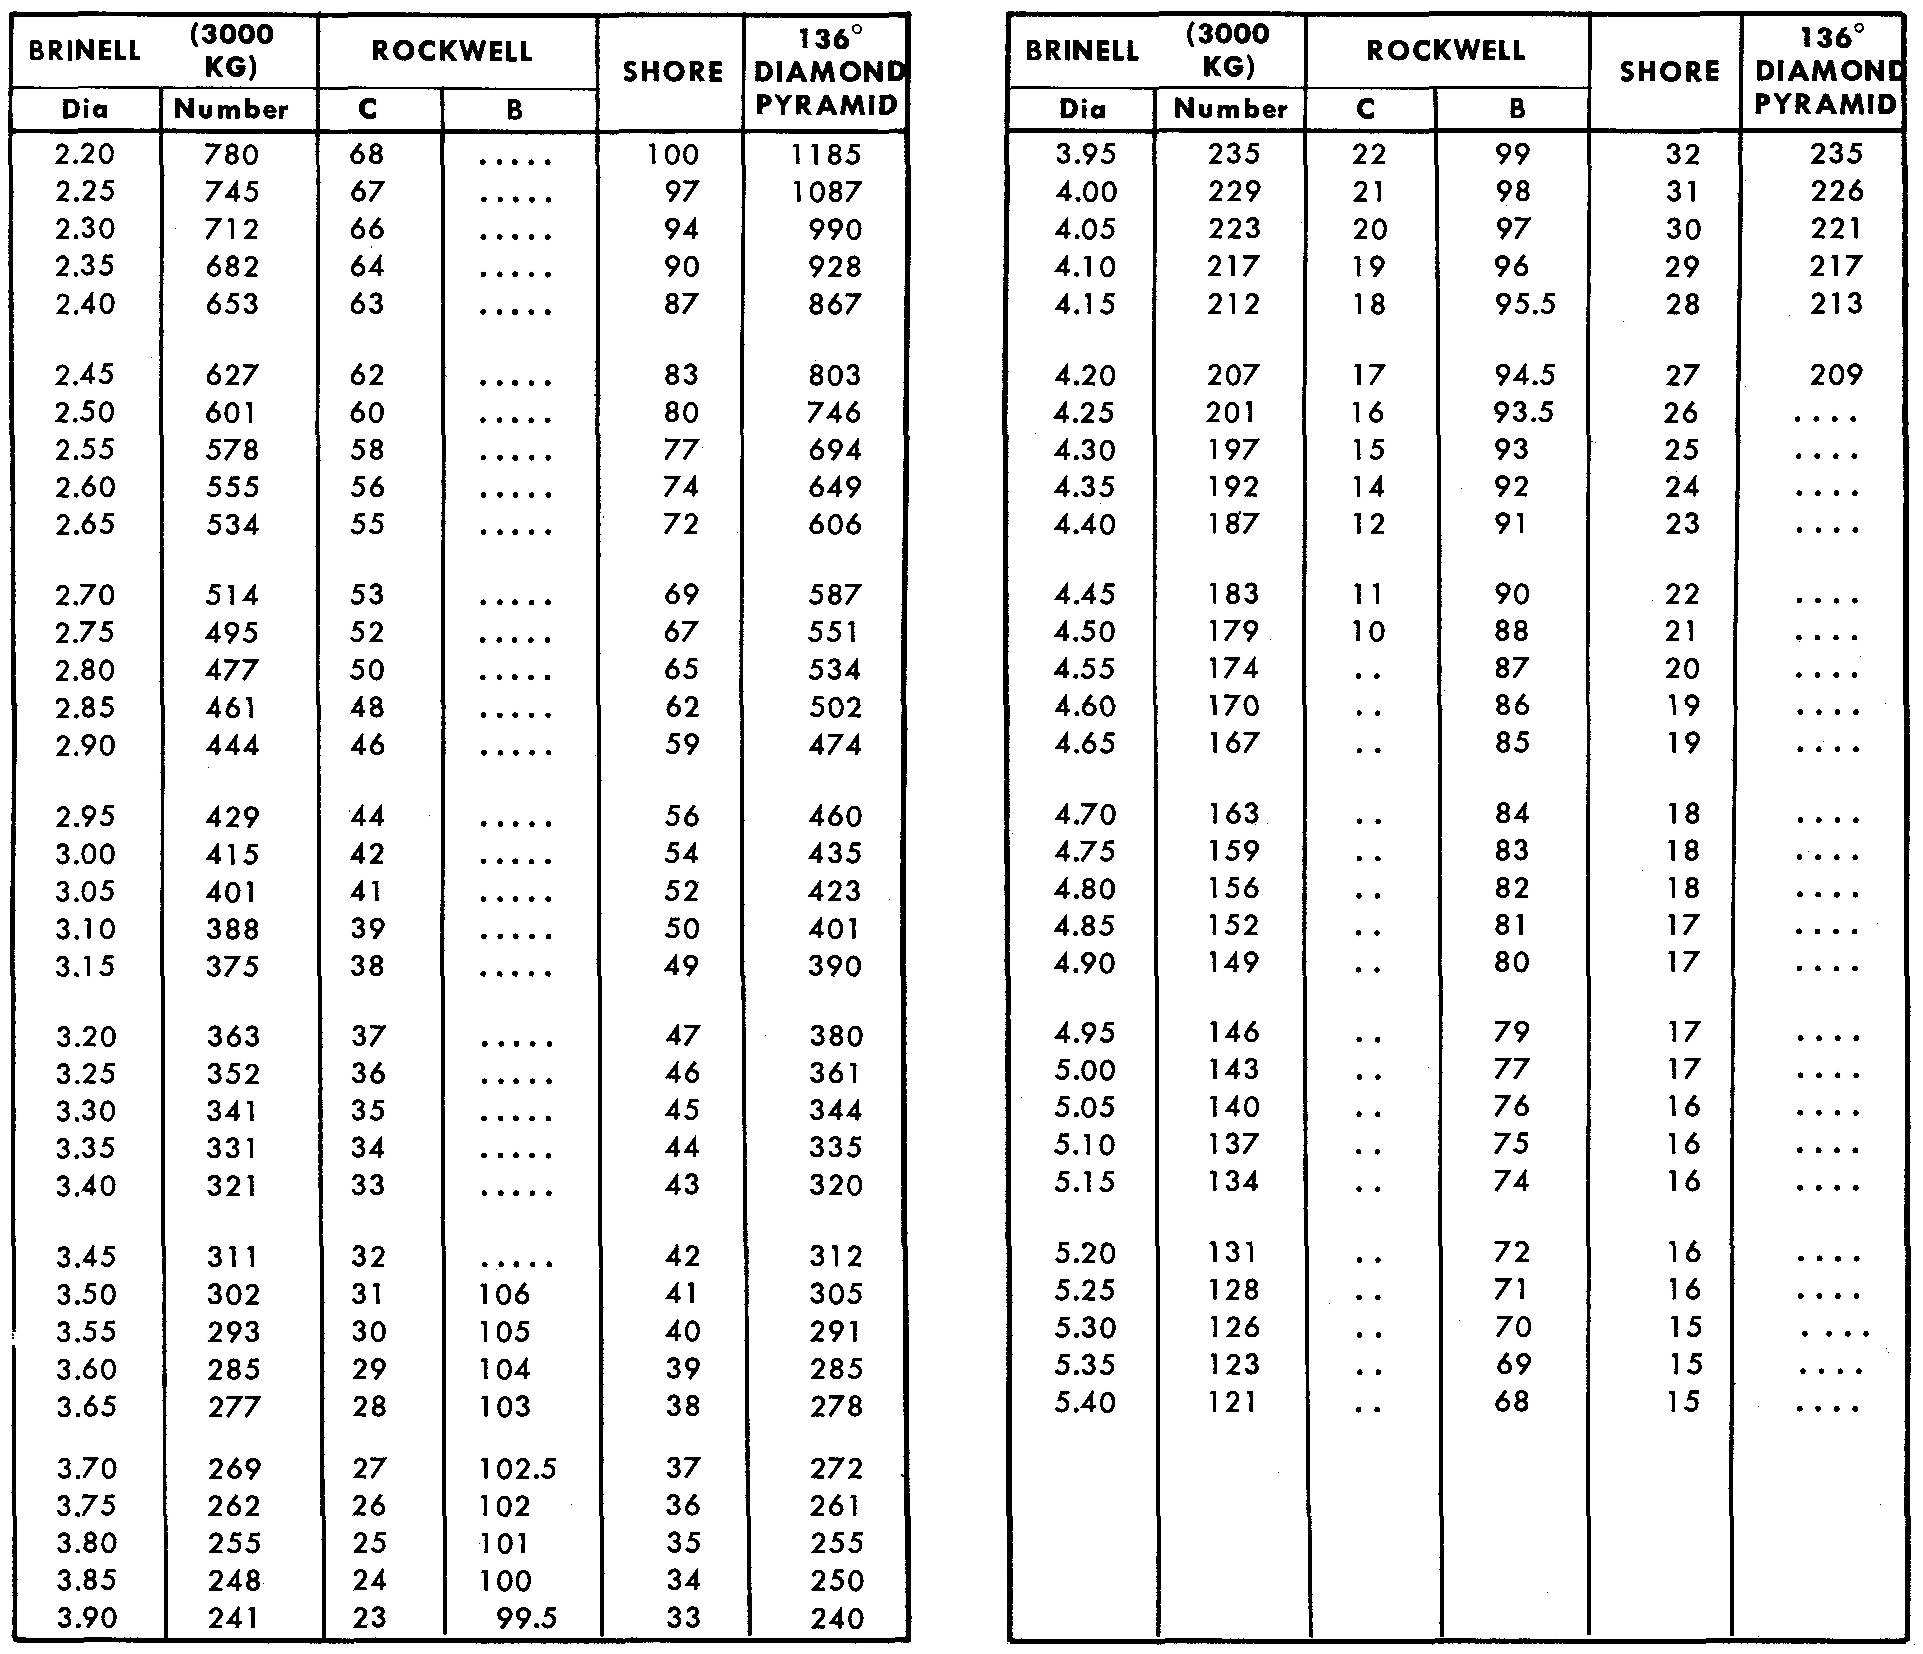
The conversion tables shown in Fig. 9-5 are used to convert the hardness values from one hardness test to another. Each column indicates the hardness values in descending order, with the larger numbers at the top of the columns standing for the hardest values.
The column labeled DIA under Brinell lists the various diameters of hardened steel balls which are used and their corresponding hardness numbers. The Rockwell tables are divided into two readings obtained by using the scales C and B.
The scale symbol used as the prefix (Rockwell C 38, for example) refers to the value read from the dial on the testing machine.
There is a wide range of available scales each dependent upon the applied load, type of penetrator, and scale on the testing machine from which the dial readings are taken.
Fig. 9-5. Hardness conversion table
Hardening notes
Parts to be hardened require precise specification on the drawing. When it becomes necessary to specify the kind of heat treatment and hardness-test values for certain parts, the draftsman should consult the heat-treatment department or the design engineer for recommendations.
In some cases, experienced machine draftsmen with sufficient knowledge of heat-treatment processes may decide by themselves which specifications are necessary. Experience may be gained by studying drawings of similar acceptable parts which have been heat-treated.
A listing of recommended materials and heat-treating processes for various machine parts is usually available in engineering handbooks from commercial literature, or from company standards manuals.
The hardening note should include a brief statement describing the necessary heat treatment, together with the type of hardness test and the hardness number required.
The selection of the heat-treatment process depends upon the kind of steel being treated and the properties desired after treatment.
The type of hardness test that is specified usually depends upon the testing equipment available at the company where the parts are to be tested.
Heat-treatment and hardness data may be placed within the detail title below the views of the part. Some companies list this data in the bill of material or place it in the space provided in the sheet title block.
Types of engineering metals
Metals are classified into two groups: ferrous and nonferrous.
Ferrous (or iron-containing) metals consist principally of iron and steel.
Nonferrous metals include metals which contain no iron or, sometimes, only a small proportion of iron.
Ferrous metals steel
Steel is an alloy composed of iron and a combination of other materials. The carbon content regulates the properties of a given type of steel.
Soft or mild grades of steel, for example, contain 1/10 of 1 percent carbon while hard steels contain up to 1-1/4 percent carbon.
The higher the carbon content in a given piece of steel, the greater will its effect be on the final properties of the metal.
Steels may be classified into five groups:
1. Carbon.
2. Alloy.
3. High-strength low alloy.
4. Stainless.
5. Tool and die.
A system of symbols standardized by AISI (American Iron and Steel Institute) and SAE (Society of Automotive Engineers) is used to identify the grades of standard alloy steels in groups 1, 2, and 4. This system is shown in Fig. 9-6.
Fig. 9-6. AISI-SAE system of designating alloy steels
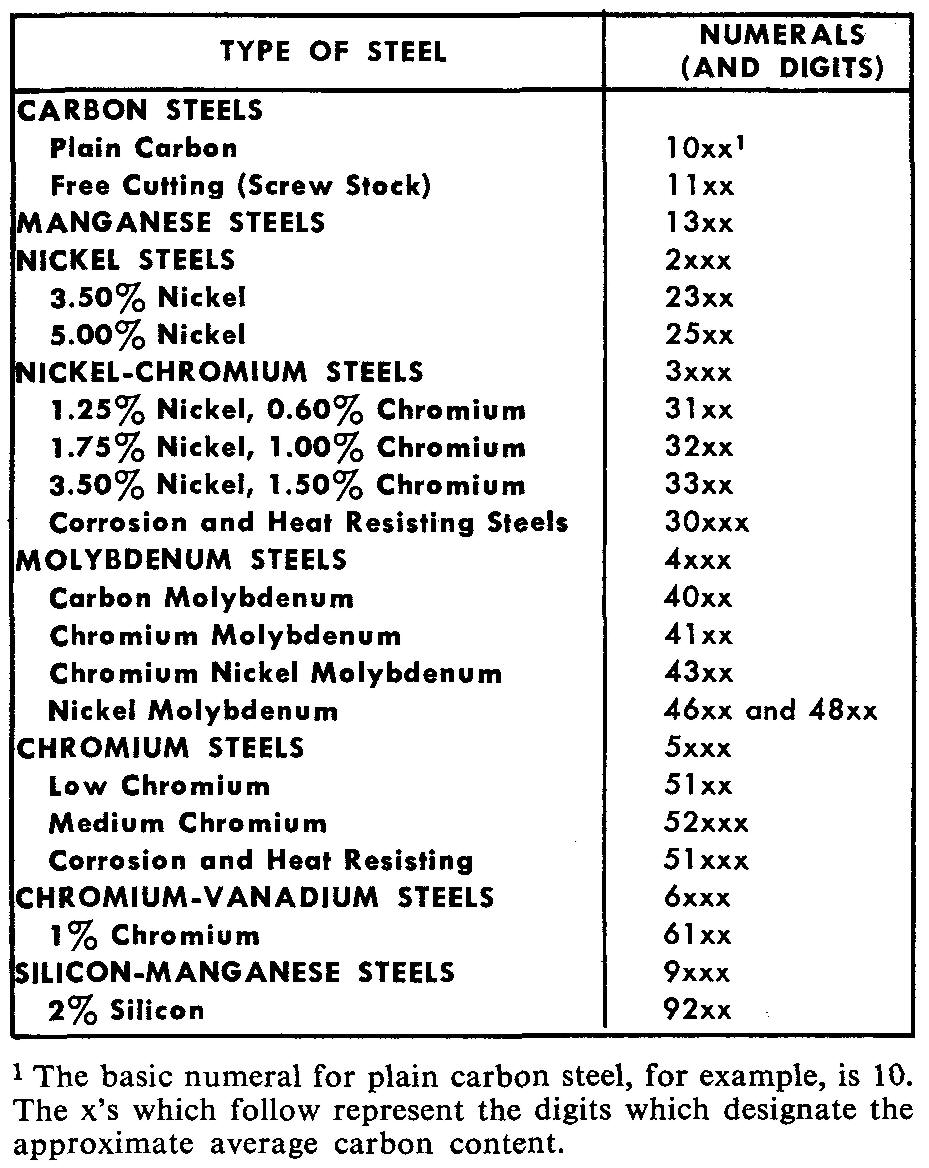
For example, a carbon steel used in the manufacture of camshafts is designated as 1020. The first two numbers (10) indicate that the steel is classed as plain carbon belonging to the carbon steel group.
The last two (and sometimes three) numbers (20) designate the approximate average carbon content, in points of hundredths of one percent. Thus, 1020 steel contains 0.20 percent carbon.
Other alloy steels are also designated by these numbers. Steel 2340 is used in the manufacture of propeller shafts. The first number (2) indicates a nickel steel, as shown in the list in Fig. 9-6.
The second number (3) indicates the approximate percentage of the alloying element (3 percent nickel). Similar to the carbon steels, the last two numbers (40) indicate the carbon content (in this case, 0.40 percent carbon).
Thus, the draftsman may describe the kind of steel desired for a particular part by using the AISI-SAE system of numerals on the drawing.
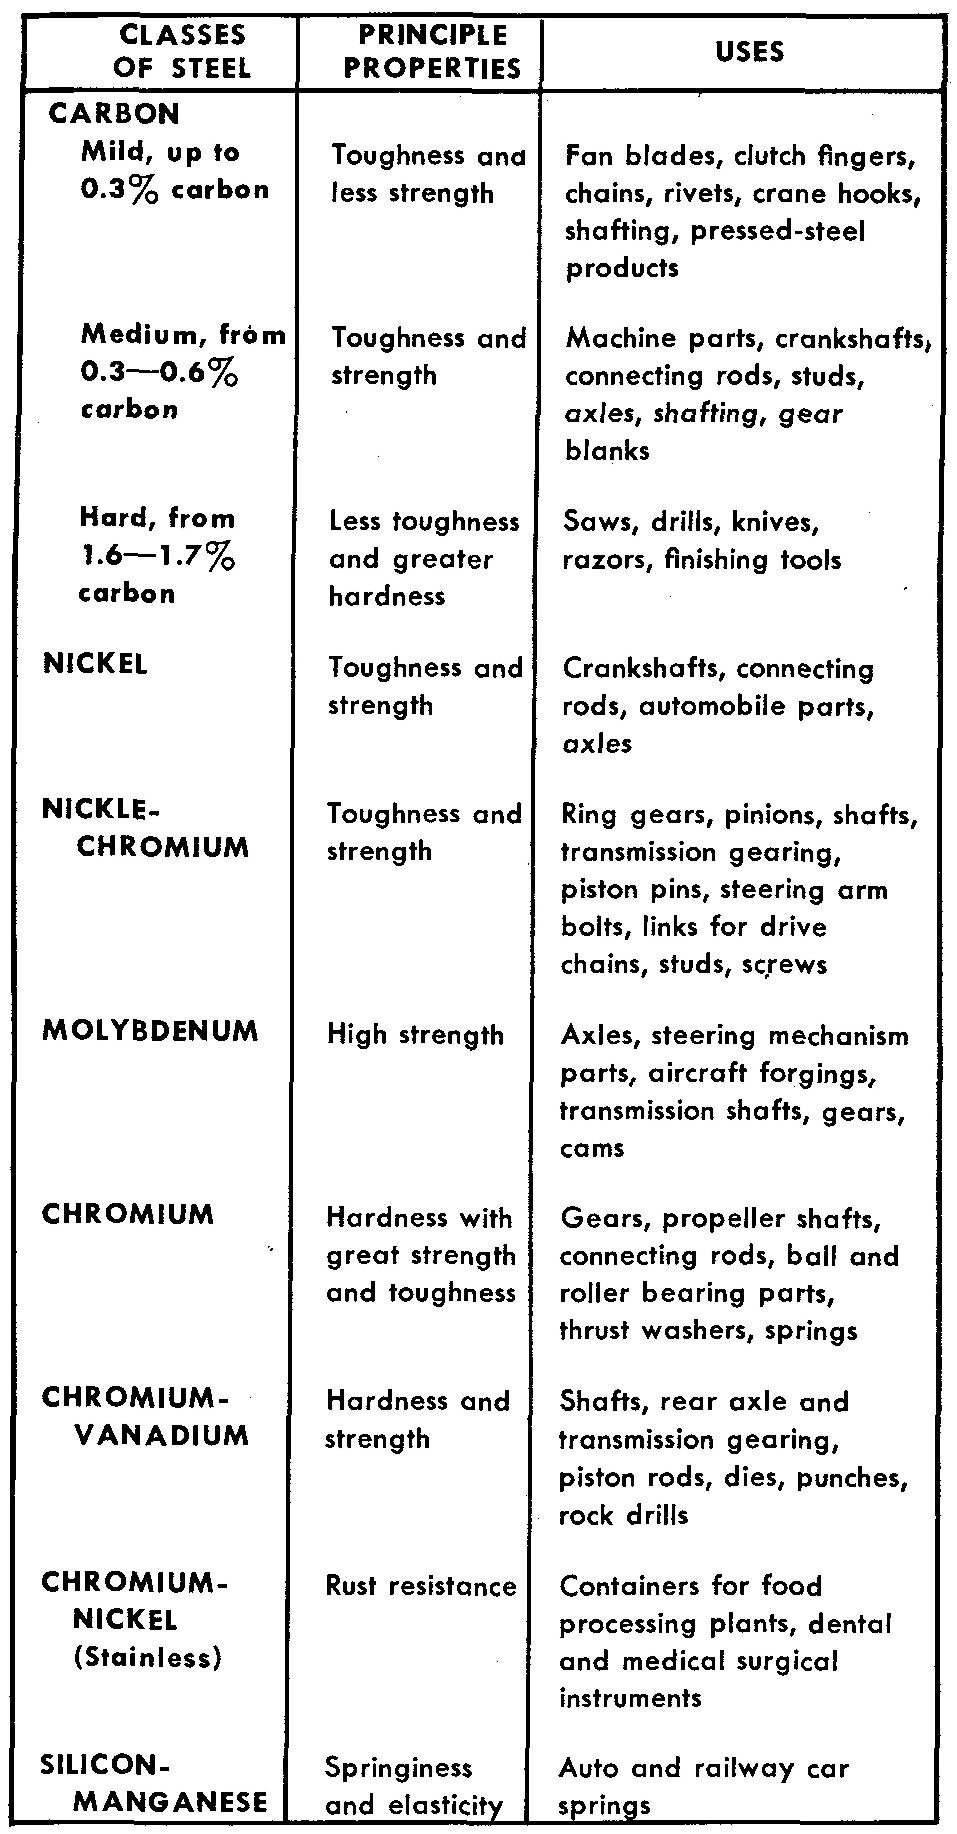
Figure 9-7 may be used as a general guide to aid in the selection of proper applications of the various classes of carbon and alloy steels.
Fig. 9-7. properties and uses of steels
Cast iron and wrought iron
Cast iron is used for the great majority of machine frames and bases.
It is also used for a wide variety of machine parts (gears, pulleys, levers, links, and so on) because it is relatively inexpensive and because it may be cast into almost any desired shape. It is a strong, hard metal and has good wearing qualities.
As the name implies, cast iron is formed by casting, usually in sand molds.
Cast iron responds to heat treatment in a way similar to steel. It may be annealed or hardened. Because cast iron is brittle, it cannot be used for parts requiring resistance to shock.
Malleable irons (produced by annealing a special grade of white cast iron) results in a softer and tougher material which is suitable for use on plows, tractors, earth moving equipment, and other heavy duty equipment.
Wrought iron contains little or no carbon. It is an almost pure form of iron which is comparatively weak and soft but tough.
Wrought iron may be readily welded. It is used largely for ornamental and structural shapes, for pipes, for boiler tubes, and for parts of electrical machinery.
Nonferrous metals
Copper
The oldest metals known to civilization are copper and its principal alloys, brass and bronze. In industrial use and importance copper ranks next to iron and steel.
Copper is a soft, tough, ductile material. It can withstand severe bending without failure and can be hammered into thin sheets and drawn into wire. Copper-base alloys may be produced as castings or as bars, rods, tubes, extrusions, sheets, or forgings.
Copper is used principally because of its high electric and heat conductivity. It is particularly useful because of its resistance to corrosion.
Uses for copper include wiring; tubing for gas, water, oil, gasoline, hydraulics, steam, and similar substances; piping applications; gutters; roofing; screening; electric contacts; radio parts; nails; rivets; and tacks.
Brass
This metal is an alloy of copper and zinc. It is resistant to corrosion.
Brass is considered to be readily workable, tough, and ductile. The exact degree to which brass possesses these properties depends upon the percentage of zinc used in the alloy.
Brass is used for piping and pipe fittings, tubing, hardware, rivets, cartridge shells, wire, lamp fixtures, eyelets, fasteners, dials, propeller shafts, costume jewelry, screen wire, springs, musical instruments, marine hardware, grillwork, radiator cores, and many other uses.
Bronze
Alloys of copper and tin are called bronze.
One of the most important copper-tin alloys is phosphor bronze, which is a strong and serviceable metal. It is used for sleeve bushings, fasteners, lock washers, wire brushes, switch parts, textile machinery, chemical hardware and fittings, and so on.
Manganese bronze, high in strength, toughness, and ductility, is used for clutch disks, pump rods, valve stems, and similar parts.
Commercial bronze is acid resisting. It is used for marine hardware, weather stripping, and so on.
Aluminum bronze is used for parts, subject to wear, which require great strength and toughness. For example, it is used for worm gears and for parts which may be exposed to salt water and other corrosive liquids.
Aluminum
This metal is very malleable and ductile.
It is a good conductor of heat and electricity, corrosion resistant, and lightweight. Pure aluminum cannot be heat-treated; therefore its strength and hardness must be increased by alloying with other elements. Aluminum alloys are identified by special numbers rather than by names.
A wide variety of aluminum alloy parts may be made by a number of different casting processes, or by forging, or by machining from bars, rods, or sheets.
Babbitt
Babbitt, or babbitt metal, is an alloy consisting of tin, copper, and antimony. Babbitt metal is primarily used for the lining of automobile and machine bearings because it will not score a shaft. It is easily bored.
Magnesium
This metal is important for its alloys which are perhaps best known for their lightweight characteristics. Aluminum is 1-1/2 times heavier, iron and steel are 4 times heavier, and copper and nickel alloys are 5 times heavier than magnesium.
Magnesium alloy parts can be cast, machined to shape, or fabricated by practically every known method.
The chief properties of magnesium alloys, in addition to lightness in weight, are their excellent machineability, their good conductivity of heat and electricity, and their nonmagnetic qualities.
Magnesium alloy parts are used to a great extent in the aircraft and transportation industries.
Other principal uses include parts for production, processing, and textile machines; and hand and power tools.
Nonmetallic engineering materials
Plastics
These materials are used to a great extent as accessories in the manufacture of machines and other structures. Plastics are composed of synthetic organic materials.
There are a number of different chemical compositions, all falling within two groups called the thermoplastics and the thermosetting plastics.
Each combination of ingredients produces a variety of advantages such as resistance to acids and to moisture; electrical insulation; ability to be machined to close tolerances; excellent surface finish; and the large range of colors available.
There are a number of companies throughout the United States who specialize in molding plastic products. These companies buy granulated powder and mold plastic items, using special equipment.
The company who will use the parts generally prepares the special drawings, which are sent to the plastic molding companies who will manufacture these parts. Few metal working industries are equipped to mold their own plastic parts.
Other specialists in plastics, called lamina-tors, make industrial products of plastic impregnated paper, linen, silk, canvas, and other sheet forms. Some of the materials are known by trade names such as Formica, Micarta, Textolite, and Fiberglas.
There are a large number of different extruded shapes which are commercially available. (Extrusion is explained in Sec. below)
These shapes are available in a wide variety of brilliant colors and color combinations. Many industries make plastic parts from standard bars, rods, tubing, or sheets. With slight modifications on cutting tools, plastics may be machined similarly to metals.
Industrial plastics products include knobs, handles, levers, switch buttons, housings, bushings, gears, cams, washers, pulleys, cutlery and tool handles, accessories for electrical machines or devices, and so on.
Plastics are used widely in the aircraft and automotive industries.
Rubber
This material is widely used in industry. Chief among the advantages of rubber are its flexibility and its air and water sealing ability.
After slight modifications have been made on cutting tools, hard rubber may be cut and machined. Uses of industrial rubber products include hoses, belting, bushings, gaskets, and insulating materials for wire and handles.
Resin-impregnated fiber
A hard, tough material, resin-impregnated fiber is often used in the making of gears and pulleys, and for parts of electrical devices, special keys, bushings, gaskets, and washers. Fiber materials may be readily machined.
Leather
Leather is used in special cases in industry for belts, packing, gears, gaskets, special washers, and the like.
Definitions of common terms
Plate
A material that is at least 6 inches wide and is 0.250 inch thick or greater.
Sheet
A material that is 6 or more inches wide and no more than 0.249 inch thick.
Strip
A material that is less than 6 inches wide and no more than 0.249 inch thick.
Bar
A material whose width approximates its thickness.
Rod
Any round stock (solid or cored) whose OD and ID sizes do not conform to standard pipe or tubing sizes.
Extrusion
Extrusion is a method of fashioning materials to a desired shape by forcing the material through an opening in a die by the force of a piston. Extruding can roughly be compared to squeezing toothpaste from a tube.
In this case, the toothpaste corresponds to the material to be extruded, and the opening in the tube acts as the die. (A die is a block of steel with the required opening.)
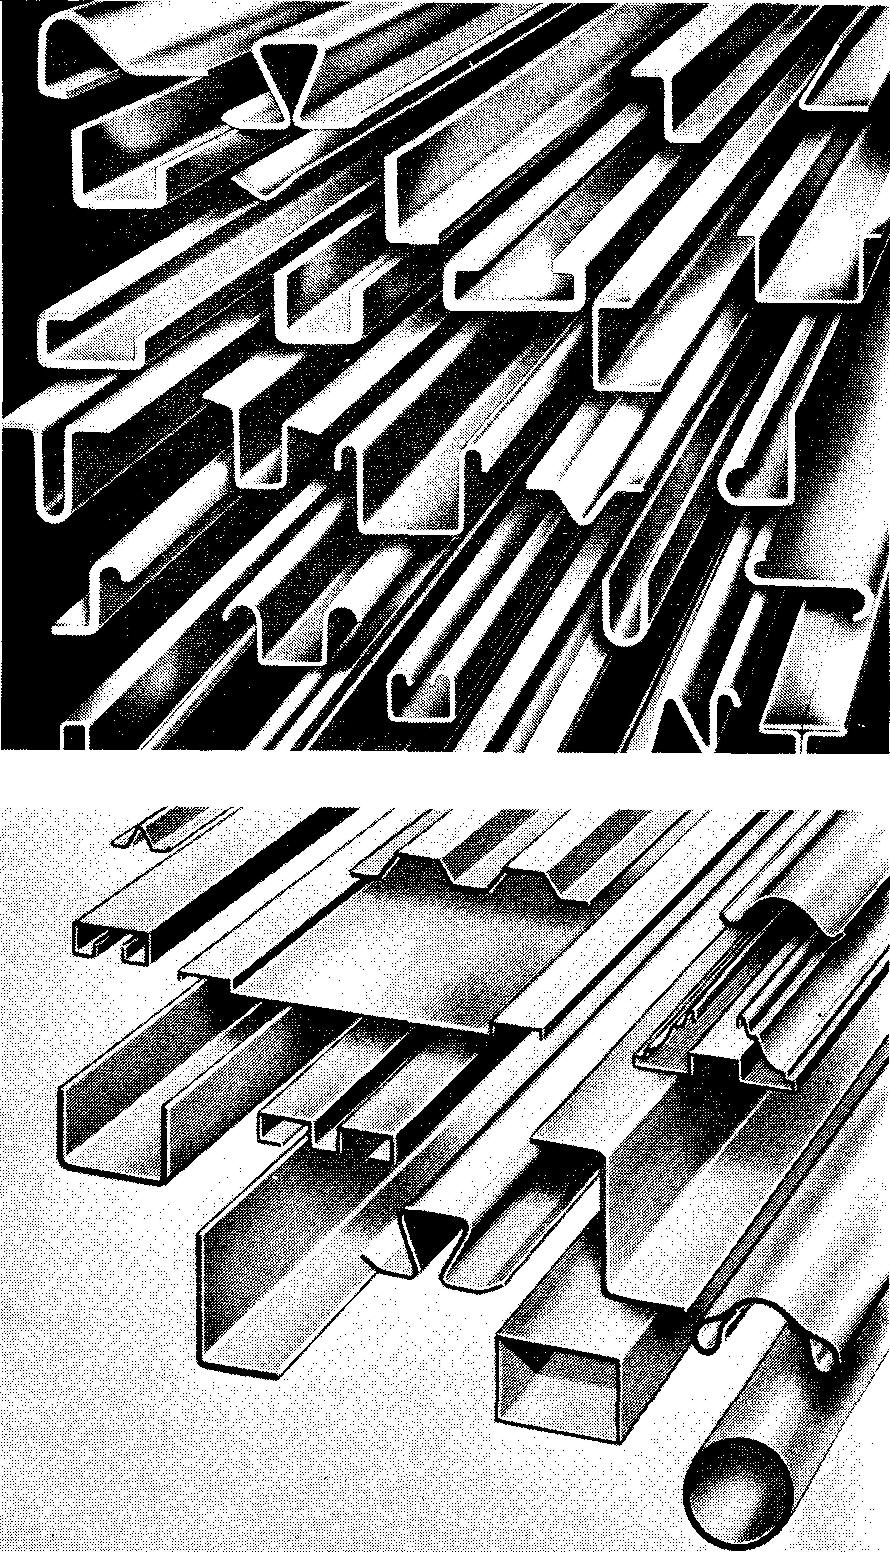
Aluminum and copper-base alloys, magnesium, lead and tin, and plastics are often shaped by extrusion. Figure 9-8 shows a variety of these shapes.
Fig. 9-8. Extruded shapes
Review questions (The answers are not given)
1. Define metals.
2. Define alloys.
3. How is it possible to obtain better properties from alloys than from pure metals?
4. Describe briefly the work of a metallurgist.
5. Explain what is meant by composition.
6. Define the following terms as applied to metals and alloys:
a. Strength.
b. Plasticity.
c. Ductility.
d. Malleability,
e. Brittleness.
f. Elasticity,
g. Conductivity.
h. Fusibility,
i. Toughness.
j. Hardness,
k. Shock resistance.
l. Fatigue limit.
m. Corrosion
n. Electric conductor.
o. Electrical resistance.
p. Metallic luster.
7. What is the purpose of heat-treating?
8. Which is the most common metal to be heat-treated?
9. What effect does the addition of carbon have on steel?
10. Define the following terms as applied to heat-treating:
a. Quenching.
b. Hardening,
c. Tempering.
d. Annealing,
e. Normalizing.
11. In general, what is the purpose of case hardening?
12. Describe the process of pack carburizing.
13. Describe the process of liquid carburizing.
14. Describe the process of nitriding.
15. Briefly describe the process of flame hardening.
16. Under what conditions would selective carburizing be specified?
17. Describe the following hardness tests:
a. Brinell.
b. Rockwell.
c. Shore scleroscope.
d. 136° Diamond Pyramid.
18. Would a Brinell hardness number of 140 be considered very hard or very soft?
19. What would the equivalent Shore hardness number be for a Rockwell hardness number of 43? The Brinell number? The 136° Diamond Pyramid number?
20. List and explain the two general classifications of metals.
21. Explain what is meant by 1065 steel.
22. Name the class of steel which would be suitable for use in making the following products:
a. Cams.
b. Dies.
c. Car springs.
d. Knives,
e. Aircraft forgings.
f. Crane hooks.
g. Surgical instruments.
23. Explain the difference between cast iron and malleable iron.
24. Which kind of iron is considered most suitable for welding?
25. What kind of iron would be most suitable for certain parts on heavy duty tractors?
26. List the principal properties of copper.
27. List five products made of brass.
28. Brass is an alloy of what two metals?
29. List the principal properties of brass.
30. List five products made of bronze.
31. Bronze is an alloy of what two metals?
32. Name the type of bronze alloy which would be specified for parts requiring the following properties:
a. Strength and toughness.
b. Acid resistance.
c. Ductility.
33. Describe the properties of aluminum.
34. Pure aluminum cannot be heat-treated. How may the strength and hardness of aluminum be increased?
35. Babbitt metal is an alloy of what metals?
36. What are the principal uses of babbitt?
37. What are the properties of magnesium?
38. Why is magnesium considered a good metal to use for aircraft parts?
39. Explain: Few metalworking industries are equipped to mold plastic parts.
40. What operations does a plastic laminating company do?
41. Name a few common plastic products.
42. Name a few common rubber products used in industry.
43. What is the difference between a plate of steel and a sheet of steel?
